VCF 5.2.1.1 , NSX 4.2.1.1 and ESXi 8.0u3c (vLCM) upgrade
This post is about the upgrade of VMware Cloud Foundation 5.2.1.0 to 5.2.1.1 in my homelab. My VCF homelab was deployed with the VCF 5.2.0 BoM and vLCM images and is not directly connected to the internet. I’m using the VCF offline depot functionality where the depot server can connect to the internet and SDDC Manager.
I was a bit late to the party, so in addition to the VCF 5.2.1.1 upgrade, I will also run the upgrade of NSX 4.2.1.0 to 4.2.1.1 and ESXi 8.0u3b to ESXi 8.0U3c with vLCM images (resulting in this lengthy post title) .
References:
VCF 5.2.1.x [Release Notes]. NSX 4.2.x [Release Notes], ESXi 8.0U3c [Release Notes]
VCF Offline Depot: [KB312168] (maybe I’ll do a blogpost on this later).
Below are the high level steps I have taken:
- Preparation
- Upgrade VCF from 5.2.1.0 -> 5.2.1.1
- NSX 4.2.1 -> NSX 4.2.1.1 Upgrade
- ESXi 8.0U3b to ESXi 8.0U3c Upgrade with vLCM Images
- Download ESXi Update from the Broadcom Portal
- Import ESXi Update to vCenter and create a new empty Cluster
- Import the ESXi image into SDDC manager
- ESXi 8.0U3c Upgrade with vLCM Image
Preparation
Since the release of VCF 5.2 there is a great new feature called Flexible BOM. However, I’d still recommend checking [KB344935] – “Applying individual product updates to VCF environments using Async Patch Tool”. There also [KB327207] – “VMware Cloud Foundation – Upgrade Bundle Details”
Since I’m using a disconnected VCF environment, with no direct internet connection, first I have to download the updates on my offline depot server with the offline bundle transfer utility (lcm-bundle-transfer-util). My depot server can connect to the internet and the SDDC Manager. The command I used was:
lcm-bundle-transfer-util --setUpOfflineDepot --sv 5.2.1.0 -offlineDepotRootDir /var/www/offline_depot --offlineDepotUrl https://depot.infrajedi.local:443 --depotUser myUserAccount --depotUserPasswordFile /root/online_depot_passwdin my case the downloaded bundles were the following:
-----------------------------------------------------------------------------------------

Bundle         | Version  |  Bundle Size | Bundle Component                    | Type

-----------------------------------------------------------------------------------------

bundle-203210  | 1.1.1.1  |     606.3 MB | ESX_HOST-8.0.3-24414501             | PATCH

bundle-202807  | 1.1.1.1  |     381.9 MB | ESX_HOST-7.0.3-24411414             | PATCH

bundle-202404  | 1.1.1.1  |    9703.3 MB | NSX_T_MANAGER-4.2.1.1.0-24405893    | PATCH

bundle-201200  | 1.1.1.1  |     752.4 MB | SDDC_MANAGER_VCF-4.5.2.0-24369040   | PATCH

bundle-202281  | 5.2.1.0  |    2364.8 MB | SDDC_MANAGER_VCF-5.2.1.1-24397777   | PATCH

bundle-202405  | 1.1.1.1  |   11599.8 MB | NSX_T_MANAGER-4.2.1.1.0-24405893    | INSTALL

-----------------------------------------------------------------------------------------
To save me some waiting time and diskspace on my depot server, I could have only downloaded the specific bundles. As you perhaps know, async patches are all version 1.1.1.1 which has something to do with the current async / flex patch architecture. The drawback of the current architecture and command I used is that other Async Patches, for example ESXi 7.0U3 (for VCF 4.x) are also downloaded.
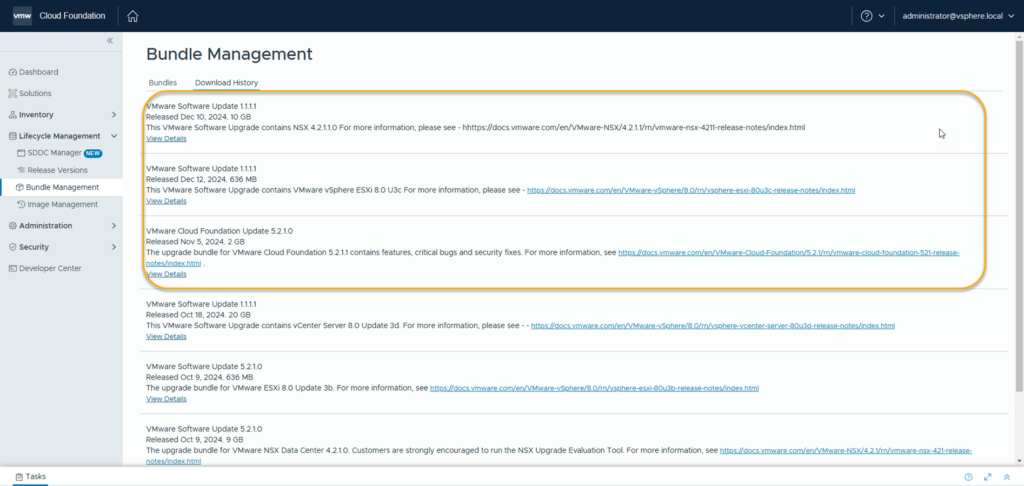
After all the downloads complete and some waiting time, the new bundles show up in SDDC Manager under Lifecycle Management, Bundle Management. Download each required bundle from SDDC Manager.
Upgrade VCF from 5.2.1.0 -> 5.2.1.1
Upgrading SDDC Manager is really easy. Before proceeding make sure a backup is in place (and know how to restore) and create a snapshot. Then:
- Go to Lifecycle Management, SDDC Manager.
- Confirm version 5.2.1.1 is available and run the precheck.
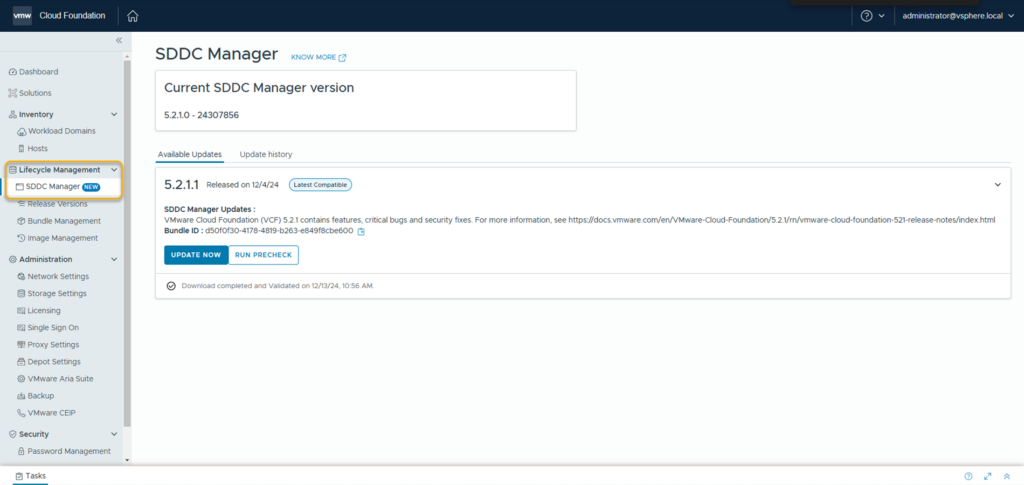
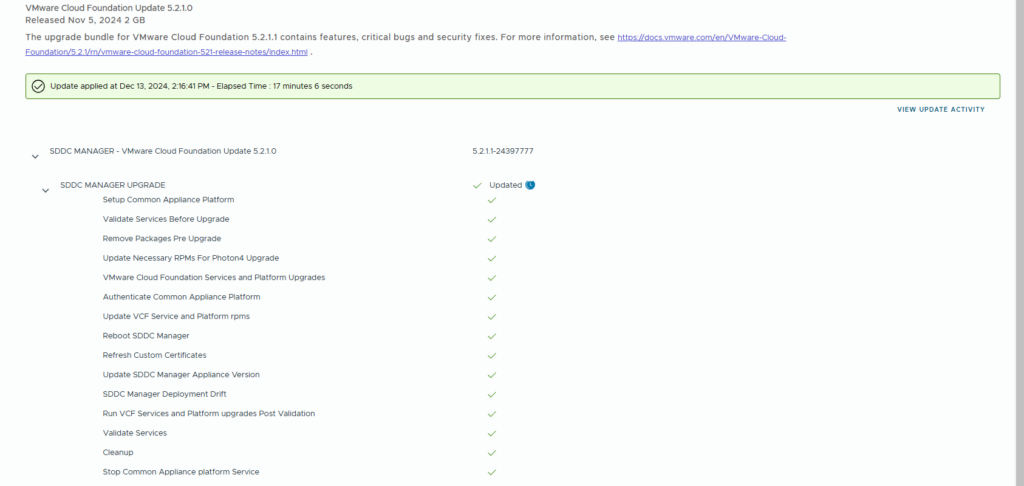
Check and fix any errors and warnings found during the precheck. Once you are ready click on the “Update Now” button. In my case everything went smoothly and it took under 18 minutes to upgrade.
NSX 4.2.1 -> NSX 4.2.1.1 Upgrade
To upgrade NSX in the Management Domain we can make use of the new Patching feature.
- Go to Inventory, Workload Domains and click the management workload domain.
- Click on the Updates tab
- Under Available Updates, Click Plan Patching
- Select VMware ESXi and NSX and the newly available target versions.

- Click Confirm

- Click Done, Configure Update
Since I have a simple deployment, there isn’t anything special to (de)select, so I went for the defaults
1. NSX Edge Cluster

Here you can choose to only upgrade NSX Edge Clusters and manually select which Edge Clusters.
2. Host Clusters

For large environments and/or specific requirements, you can choose to upgrade (a) specific cluster(s).
3. Upgrade Options

For large environments and/or specific requirements, you can choose to enable sequential upgrades of NSX Edge and/or Host Clusters.
Note: Since VCF 5.2.1 it is possible to use in-place upgrades on workload domains using vLCM images.
4. Review your configuration
- Schedule Upgrade, Upgrade Now
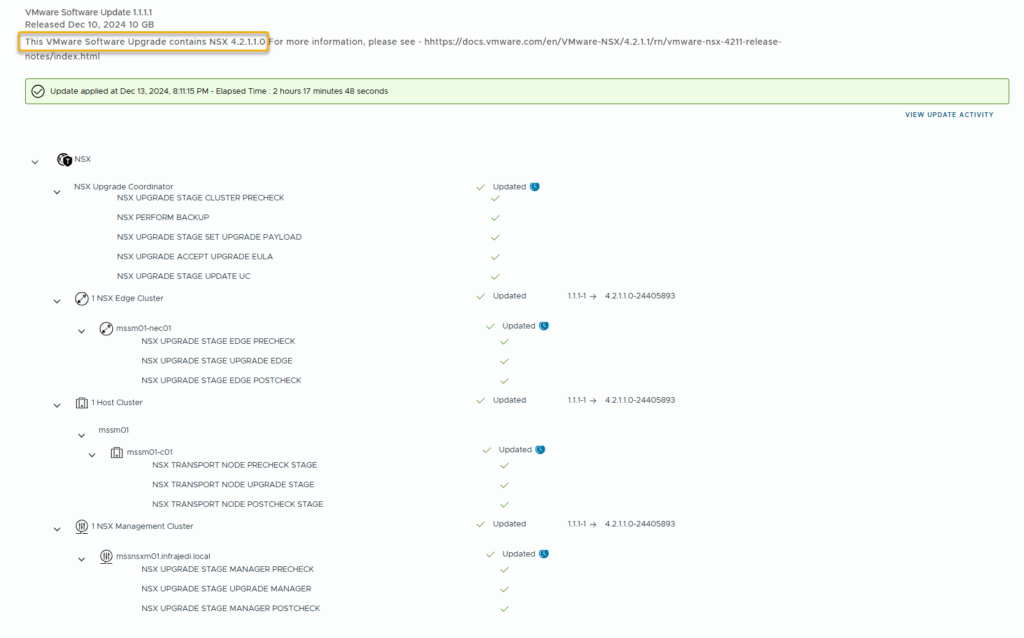
You can now check the NSX Upgrade workflow and SDDC Manager task and subtasks:

- Upgrade Upgrade Coordinator
- Upgrade NSX Edge Clusters
- Upgrade NSX Host Clusters
- Upgrade NSX Manager
You may want to use the Refresh button since the screen is not refreshing by itself.
The upgrade of the Upgrade Coordinator, Edge Clusters and host went without issues.
ESXi 8.0U3b to ESXi 8.0U3c Upgrade with vLCM Images
As mentioned in the beginning of the post, this environment was deployed as VCF 5.2.0 with vLCM images configured. This means that during bringup, the cluster Updates mechanism is converted to Image based management. Also mentioned is that this VCF environment, including vCenter does not have an internet connection.
In this upgrade cycle the ESXi hosts are upgraded from version 8.0U3b to 8.0U3c.
Download ESXi Update from the Broadcom Portal
Since the management domain is configured with vLCM images, you can only upgrade by using a newer Cluster Image. To import this Cluster Image into SDDC Manager you need to extract the Cluster Image from an existing cluster or import the image which you exported an external vCenter. Since I only have this environment running, that may sound like quite a challenge. In fact it’s not so hard, but it does take more steps than I would like to.
First you need to download and import the ESXi depot file from the Broadcom Support portal. With the new Broadcom portal you may still need to find your way around, but the way to get the ESXi (and vCenter) patches is through My Downloads, VMware vSphere, Solutions tab (on top), <edition> and there you have it. The filename is: VMware-ESXi-8.0U3c-24414501-depot.zip
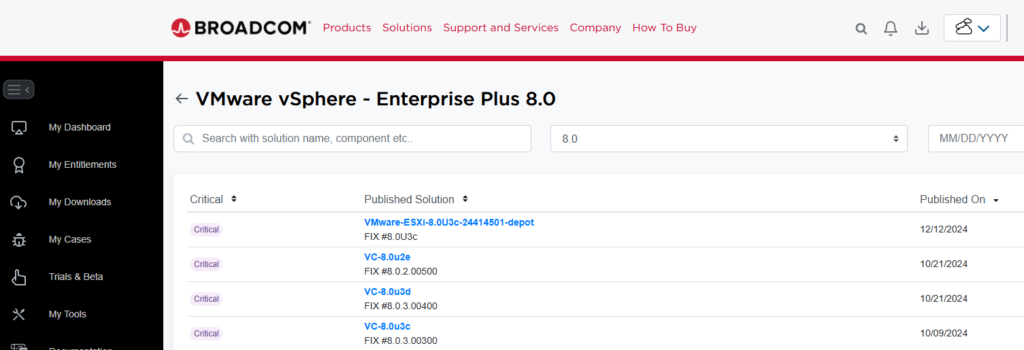
Download the depot file and import it in the Management vCenter with Lifecycle Manager.
Import ESXi Update to vCenter and create a new empty Cluster

After the Image is imported, the next step is to create a new, empty cluster.
Select Manage all hosts in the cluster with a single image, Compose a new image.
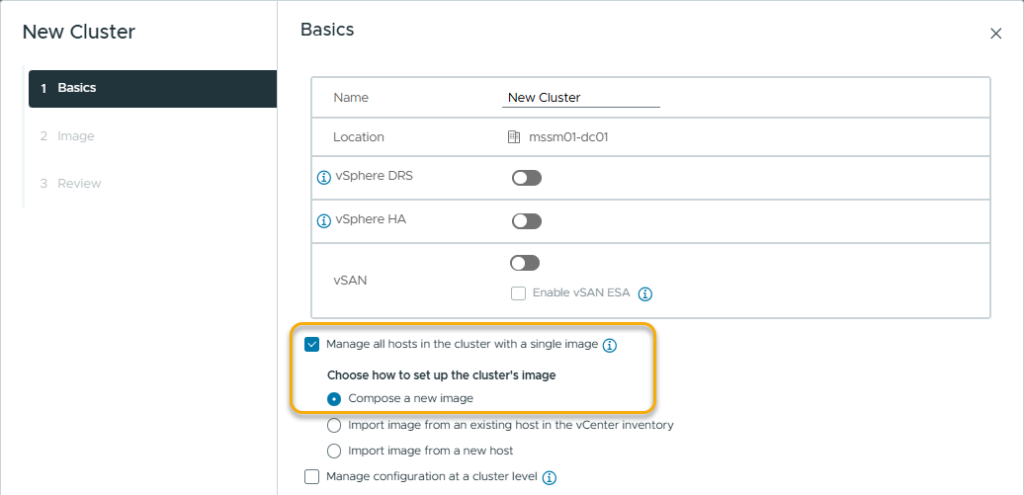
In the next screen you can add vendor addons (which I didn’t do).
Import the ESXi image into SDDC manager
Switch back to SDDC Manager, Lifecycle Management, Image Management.
On tab Import Image, under Option 1, Select your management domain and the newly created Cluster. Choose a name for your image and click Extract Cluster Image.
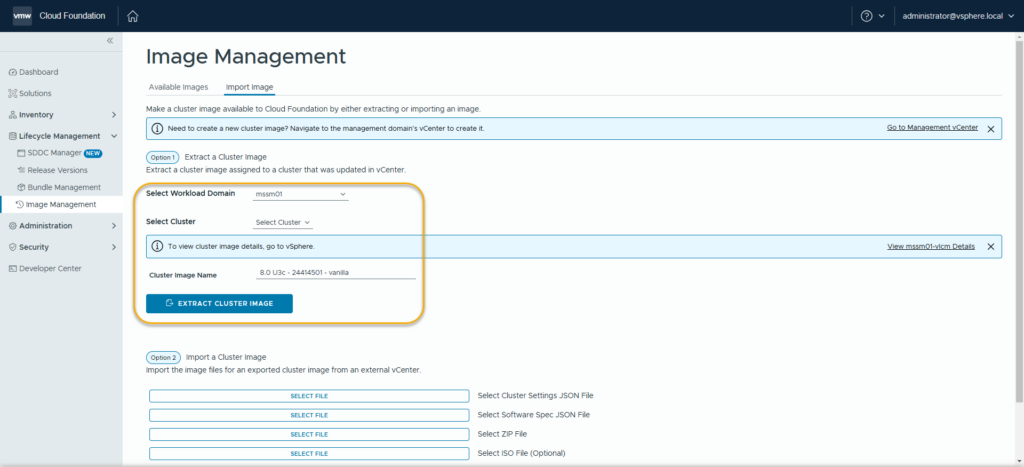
After extraction, the image is now listed under the tab Available Images and ready to be used.

ESXi 8.0U3c Upgrade with vLCM Image
- Go to Inventory, Workload Domains and click the management workload domain.
- Click on the Updates tab
- Under Available Updates, Click Configure Update and go through the screens;
1. Cluster Precheck
Run the precheck. For nested Labs you may want to silence some vSAN Skyline Health findings in vCenter. You can ignore the Error messages PVSCSI SCSI Controller: Device is incompatible.
2. Select Clusters with Images
Select the Management Cluster
3. Assign Images
Select the previously imported Image
4. Upgrade Options
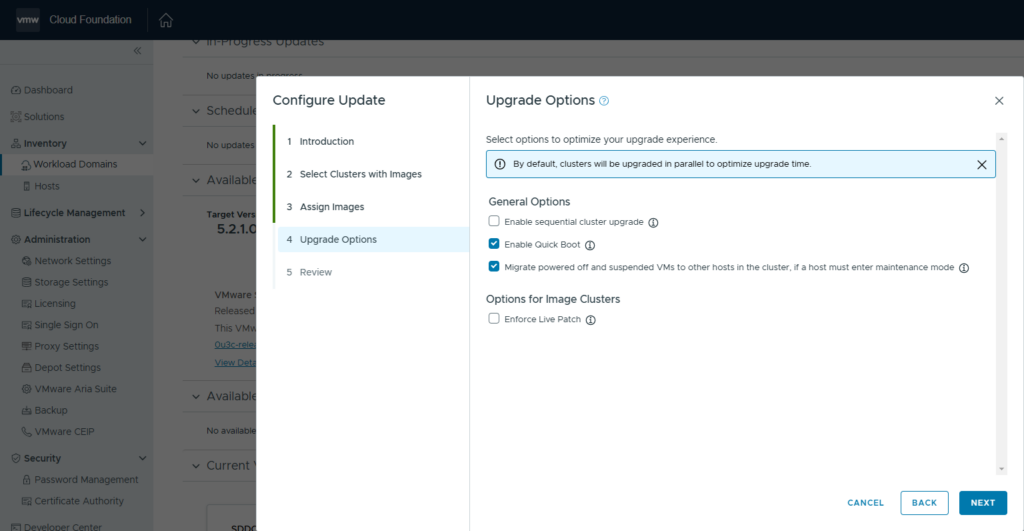
5. Review
- Schedule Upgrade, Upgrade Now
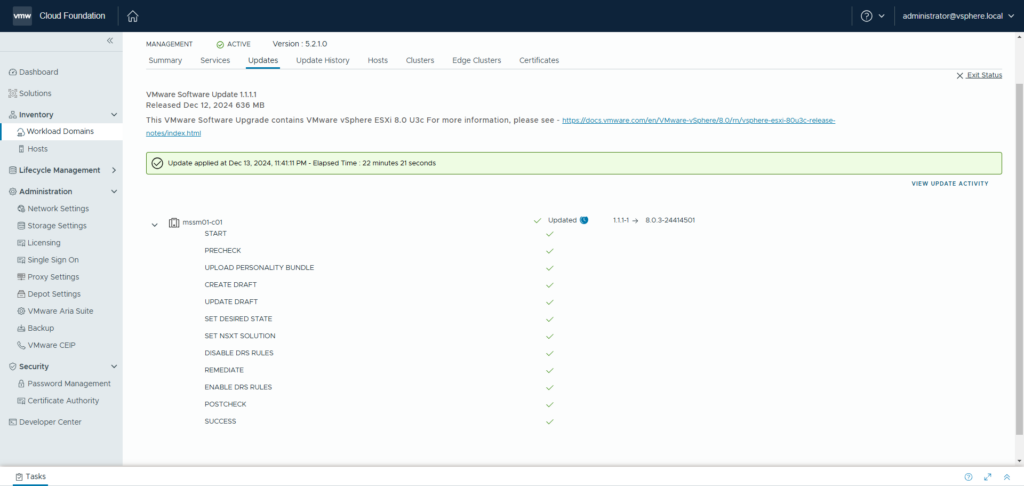
In vCenter it looks like this.
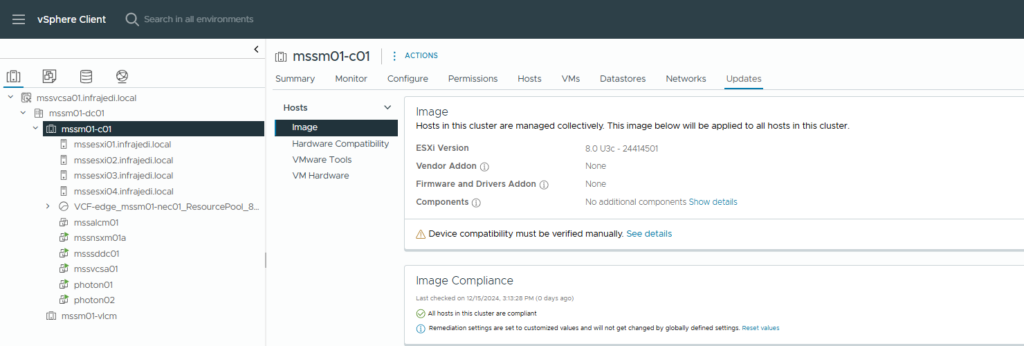
This concludes the end of all the upgrades. I hope it is useful to someone 😉
3 Responses
-
Pingback: SDDC-Manager tips&tricks – vTAM



Thanks. Great article. Any ideas how to cleanup imported image profiles from SDDC?