VCF 9.1 Offline Depot Setup and configuration
Click to open Table of contents
Contents
VCF Offline Depot Installation. 3
Configure static IP Address. 3
Install tools and update the system.. 4
Create self-signed webserver certificate. 4
Create self-signed webserver certificate signing request (CSR) for your own CA.. 5
Apache webserver installation and configuration. 6
Finalizing Webserver configuration for HTTP and/or HTTPS.. 7
Configure NFS Client and mount NFS share (optional) 8
Installation of VCF Download Tool 9
Configuration for ESX downloads: 9
Download required VCF installation files. 9
Deploy VCF with the VCF Installer 10
Configure Offline Depot after VCF Deployment 11
Introduction
This post describes the installation and configuration of an Ubuntu based offline depot webserver for VCF 9.1. This latest version has a couple of improvements making the previous post obsolete.
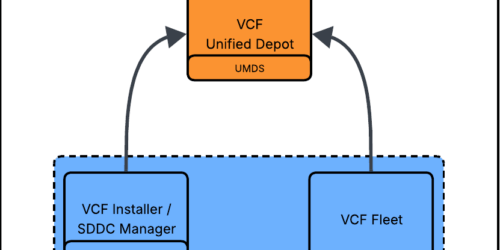
For dark / disconnected VCF 9 deployments, you can make use of an offline depot to download installation and update files for VCF 9. The offline depot can be used in the VCF Installer during deployment and by the Fleet Depot after installation. See Marco’s [post].
VCF Offline Depot Installation
Ubuntu basic setup
I chose Ubuntu 24.04 (“Noble Numbat”) as platform for the depot and deployed this from the current ova file from the Ubuntu Cloudimages repository [link]. During ova deployment you can configure the hostname (fqdn) and configure a password which you are forced to change the first time you login. After this was completed, I followed the steps below.
- Update the System
- Configure Static IP Address
- Configure SSH
- Install & Configure Apache
- Configure NFS Client and mount NFS share (optional)
Note: probably not a best practice, but I’m using the sudo su command first, so all commands below do not require sudo.
Configure static IP Address
=> Create the file /etc/cloud/cloud.cfg.d/99-disable-network-config.cfg to disable cloud-init networking:
touch /etc/cloud/cloud.cfg.d/99-disable-network-config.cfg=> Edit the this file with vi and add the line below (so this is the only contents of the file):
network: {config: disabled}=> Create and edit a new Network configuration file /etc/netplan/50-cloud-init.yaml
vi /etc/netplan/50-cloud-init.yamlAdd your network configuration. Contents of /etc/netplan/50-cloud-init.yaml
network:
  version: 2
  renderer: networkd
  ethernets:
    ens192:
      addresses:
        - 172.16.1.115/24
      nameservers:
        addresses : [172.16.1.21, 172.16.1.22]
        search: [vtam.lab]
      routes:
        - to: default
          via: 172.16.1.1
Test/apply network configuration with the netplan command:
netplan apply…or restart networkd en resolved:
systemctl restart systemd-networkd.service
systemctl restart systemd-resolved.service
Configure hostname
During ova deployment, I configured my hostname as depot.vtam.lab. You can see the hostname on your prompt and or check the hostname with one of the following commands:
hostname
hostname -f
hostnamectl
If you want to change the hostname, you can use the hostnamectl command:
hostnamectl set-hostname depot.vtam.labConfigure SSH
To make it possible to login with a username and password you can configure the SSH service by editing the /etc/ssh/sshd_config file. Search for the lines below and make changes accordingly:
StrictModes no
PasswordAuthentication yes
Add the line:
ChallengeResponseAuthentication yesRestart the sshd service:
systemctl restart sshdTest if you can ssh to the server with username ubuntu and the password you have configured.
Install tools and update the system
Install the jq (for json export) and nfs-common (if you use an NFS share on your depot server) packages and update the Ubuntu OS:
apt install jq
apt install nfs-common
apt update && apt upgrade
Create self-signed webserver certificate
If you just want to generate a self-signed certificate for apache without making use of your CA, use the openssl command below:
openssl req -x509 -nodes -days 365 -newkey rsa:2048 \
    -subj "/CN=depot.vtam.lab" \
    -keyout /etc/ssl/private/depot.key \
    -out /etc/ssl/certs/depot.crt
Note the location and filenames of the private key and certificate.
- Private key: /etc/ssl/private/depot.key
- Certificate: /etc/ssl/certs/depot.crt
For pre-VCF 9.1.1 Download / export the private key (depot.key) and certificate (depot.crt) for later use on the VCF Installer and or SDDC Manager appliance. See [previous post].
Create self-signed webserver certificate signing request (CSR) for your own CA
If you want to generate a self-signed certificate for apache by making use of your own CA, first generate an openssl configuration file, for example \home\ubuntu\depotcert.conf with the following contents:
[req]
distinguished_name = req_distinguished_name
req_extensions = req_ext
prompt = no

[req_distinguished_name]
C   = NL
ST  = ZH
L   = Maassluis
O   = vtam
OU  = lab
CN  = depot.vtam.lab

[req_ext]
subjectAltName = @alt_names

[alt_names]
DNS.1 = depot.vtam.lab
IP.1 = 172.16.1.115
Create certificate signing request (CSR) on the depot server:
openssl req -new -newkey rsa:4096 -nodes -keyout depot.key -out depot.csr -config depotcert.confWith this CSR you can create the server certificate on your your Microsoft CA. I won’t go through the setup of the MS CA, but should be quite strait forward. I’m using the following command line to generate the certificate:
certreq -adminforcemachine -config "ca01\vtamca01" -submit -attrib "CertificateTemplate: VMware" "Y:\homelab\certs\depot.csr"Apache webserver installation and configuration
Install Apache
Install the apache webserver with the apt command:
apt install apache2Test the webpage in your browser (should show Ubuntu Apache2 Default Page).
Create a directory to store the offline depot files with the mkdir command:
mkdir -p /var/www/offline_depotOption 1: HTTP without authentication
Create a configuration file for HTTP depot website in the /etc/apache2/sites-available/ directory:
vi /etc/apache2/sites-available/depot_http.confWith contents:
<VirtualHost *:80>
  ServerAdmin webmaster@vtam.lab
  ServerName depot.vtam.lab
  DocumentRoot /var/www/offline_depot
  ErrorLog ${APACHE_LOG_DIR}/error.log
  CustomLog ${APACHE_LOG_DIR}/access.log combined
<Directory "/var/www/offline_depot">
  Require all granted
</Directory>
Alias /products/v1/bundles/lastupdatedtime /var/www/offline_depot/PROD2/vsan/hcl/lastupdatedtime.json
Alias /products/v1/bundles/all /var/www/offline_depot/PROD2/vsan/hcl/all.json
Alias /Compatibility/VxrailCompatibilityData.json /var/www/offline_depot/PROD2/evo/vmw/Compatibility/VxrailCompatibilityData.json
</VirtualHost>
Option 2: HTTPS with basic authentication
Create a configuration file for HTTPS depot website in the /etc/apache2/sites-available/ directory:
vi /etc/apache2/sites-available/depot_https.confWith contents:
<IfModule mod_ssl.c>
<VirtualHost *:443>
  ServerAdmin webmaster@vtam.lab
  ServerName depot.vtam.lab
  DocumentRoot /var/www/offline_depot
  SSLEngine on
  SSLCertificateFile /etc/ssl/certs/depot.crt
  SSLCertificateKeyFile /etc/ssl/private/depot.key
  ErrorLog ${APACHE_LOG_DIR}/error.log
  CustomLog ${APACHE_LOG_DIR}/access.log combined
<Directory "/var/www/offline_depot">
  AuthType Basic
  AuthName "Restricted Content"
  AuthUserFile /etc/apache2/.htpasswd
  Require valid-user
</Directory>
Alias /products/v1/bundles/lastupdatedtime /var/www/offline_depot/PROD2/vsan/hcl                                                                                                                                /lastupdatedtime.json
Alias /products/v1/bundles/all /var/www/offline_depot/PROD2/vsan/hcl/all.json
Alias /Compatibility/VxrailCompatibilityData.json /var/www/offline_depot/PROD2/e                                                                                                                                vo/vmw/Compatibility/VxrailCompatibilityData.json
</VirtualHost>
</IfModule>
Note: both http and https configurations can be active the same time.
To make the HTTPS depot work with VCF Installer, you have to setup basic authentication and create credentials. Add a basic auth user with the htpasswd command:
htpasswd -c /etc/apache2/.htpasswd vcf
New password: ****************
Re-type new password: ****************
Adding password for user vcf
Note: I have chosen vcf as username, but it can be anything you prefer.
Finalizing Webserver configuration for HTTP and/or HTTPS
Enable the depot site(s) and ssl module with commands:
For HTTP:
a2ensite depot_httpFor HTTPS:
a2enmod ssl
a2ensite depot_https
Note: you can disable the default website with:
a2dissite 000-defaultTest the apache configuration with command:
apachectl configtestRestart the apache service with command:
systemctl restart apache2- Test the HTTP depot website in the browser: http://depot.vtam.lab
- Test the HTTPS depot website in the browser: https://depot.vtam.lab
- => Your browser should show a popup, requesting a username / password (as configured with the htpasswd command).
Configure NFS Client and mount NFS share (optional)
This is an optional step if you want to store the depot files on a NFS share. I have a NFS 4.1 share named “ISO” on my NAS with a subdirectory /VMware/VCF9/VCF9110. To use this share on Ubuntu start by installing the NFS client tools with apt:
apt install nfs-commonTest if you can mount the NFS share to the offline depot website directory:
mount -o vers=4.1 192.168.1.20:/ISO/VMware/VCF9/VCF9110 /var/www/offline_depotTo make the mount permanent edit the /etc/fstab file and add this line:
192.168.1.20:/ISO/VMware/VCF9/VCF9110 on /var/www/offline_depot type nfs4 (rw,noatime,vers=4.1,rsize=1048576,wsize=1048576,namlen=255,acregmin=1800,acregmax=1800,acdirmin=1800,acdirmax=1800,hard,proto=tcp,timeo=600,retrans=2,sec=sys,clientaddr=172.16.1.115,local_lock=none,addr=192.168.1.20)
Installation of VCF Download Tool
The VCF Download Tool (VCFDT) replaces the VCF Offline Bundle Transfer utility (OBTU) you may know from VCF 5.x and is used for downloading VCF 9 binaries, patches and updates. Since VCF 9.1 you can also use the VCFDT to download ESX binaries and updates. Note that the newer download activation token is needed instead of the previous depot download token.
Download the vcf-download-tool-9.1.1.0.25713929.tar.gz from the Broadcom portal to /home/ubuntu/vcfdt and extract the tar file.
Configuration for ESX downloads:
As mentioned above, the VCFDT 9.1 can now download ESX updates. You can check the current ESX download configuration with command:
/home/ubuntu/vcfdt/bin/vcf-download-tool esx configuration -GYou can disable older and ARM versions of ESX(i) with command:
/home/ubuntu/vcfdt/bin/vcf-download-tool esx configuration -D=embeddedEsx-6.7-INTL -D=embeddedEsx-7.0-INTL -D=embeddedEsx-8.0-INTL -D=embeddedEsx-9.0-INTL -D=esxio-8.0-INTL -D=esxio-9.0-INTL -D=esxio-9.1-INTL -D=armEsx-9.1-INTLCommand to enable download of a specific version of ESX(i):
/home/ubuntu/vcfdt/bin/vcf-download-tool esx configuration -E=embeddedEsx-9.1-INTLCommand to download ESX install and updates:
/home/ubuntu/vcfdt/bin/vcf-download-tool esx download --depot-download-activation-code-file=/home/ubuntu/atoken --depot-store=/var/www/offline_depotDownload required VCF installation files
Command to download the required files for a VCF Installation:
/home/ubuntu/vcfdt/bin/vcf-download-tool binaries download --depot-download-activation-code-file=/home/ubuntu/atoken --depot-store=/var/www/offline_depot --vcf-version=9.1.1.0 --type=INSTALLSee Appendix / other blog for a more VCFDT commands.
Deploy VCF with the VCF Installer
Download the VCF Installer from the Broadcom Support Portal, or pick it up from the offline depot directory (PROD\COMP\SDDC_MANAGER_VCF). I used the VCF Installer 9.1.1.0 (VCF-SDDC-Manager-Appliance-9.1.1.0.25713928.ova).
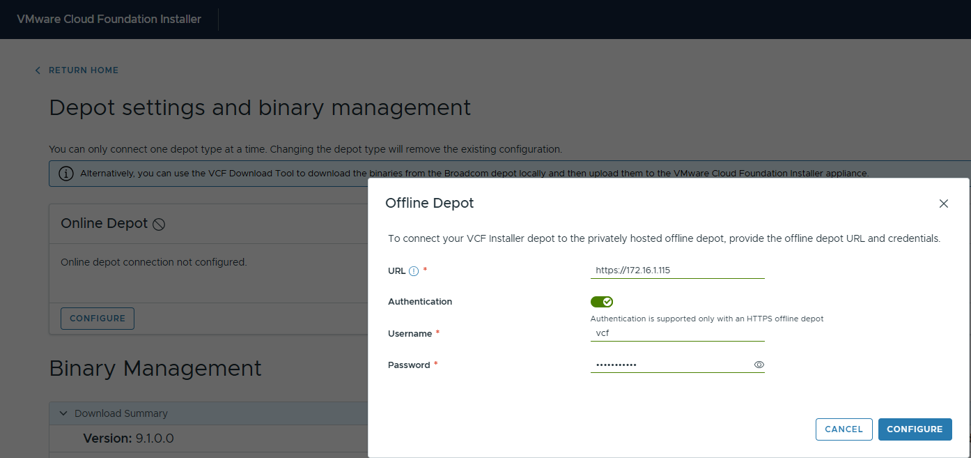
Depending on your depot webserver configuration you can connect to the offline depot as follows:
- HTTP without authentication.
- HTTPS with or without authentication.
The good news is that the VCF Installer 9.1 now has the option in the UI to accept the offline depot certificate, so you won’t have to go through manual import.
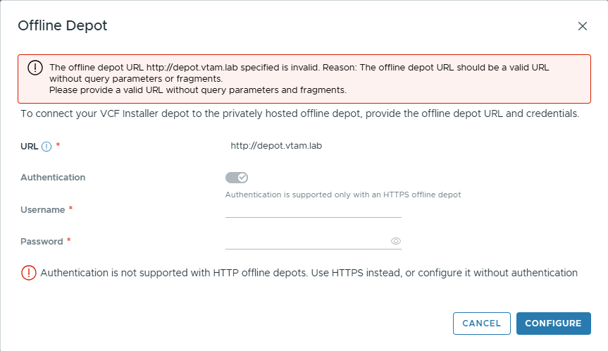
=> There is one new catch however; if you are using a DNS domain name like .local, the VCF Installer will throw an error: “The offline depot URL specified is invalid. Reason: the offline depot URL should be a valid url without query parameters of fragments. “. In that case you should use the IP address to connect. For more information see RFC 6762 and this [blog]
Configure Offline Depot after VCF Deployment
If the VCF Installer was deployed in the Management Cluster, the offline depot is automatically configured with the same. However if you use the VCF Installer from outside the VCF cluster, it stays as a standalone appliance and in this case you have to configure the offline depot in the Software Depot
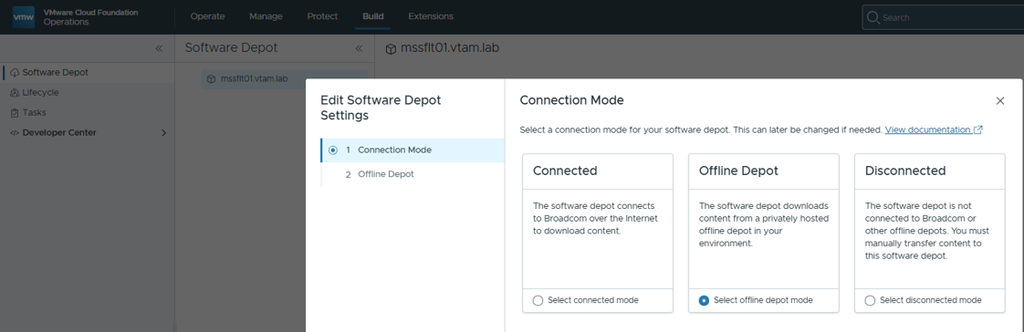
The new VCF Software Depot can be configured in three ways: Connected, Offline Depot and Disconnected.
=> For the Offline Depot configuration login to VCF Operations and go to Build -> Software Depot
=> Click on Edit and select Offline Depot Mode
=> If using HTTPS, the UI requests to accept the certificate during validation.
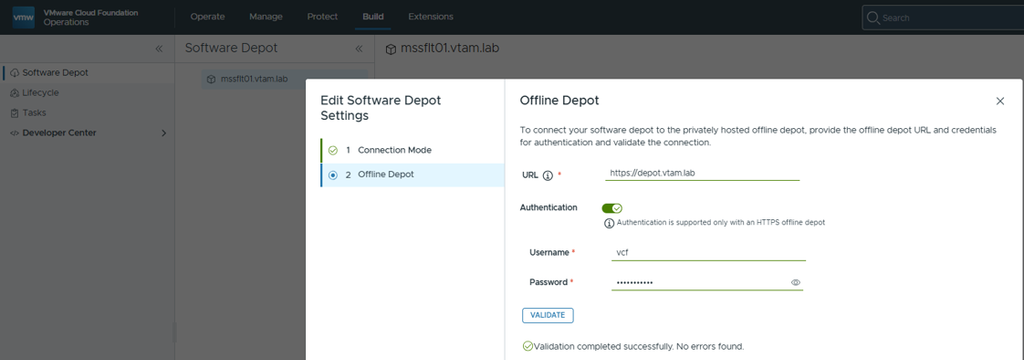
Result looks like this:
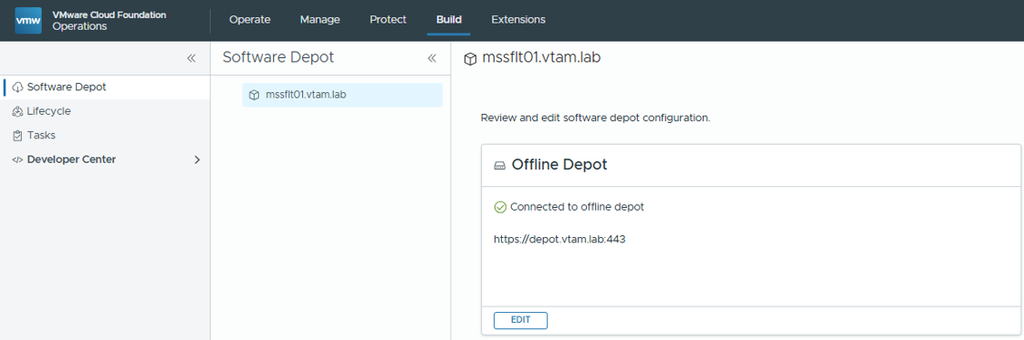
Notice the port addition 443 (or 80 when using HTTP)
Note that SDDC Manager also uses the Software Depot settings for downloads:
Overview in vCenter
vCenter can use the SDDC Manager to download its updates by applying a VCF Instance configuration update. When you check the Download Sources configuration in vCenter Lifecycle Manager, you will notice an additional source is added. In my case: https://msssddc01.vtam.lab/vmware/vcf/umds/patch-store/hostupdate/__hostupdate20-consolidated-index__.xml