How to create your own Nested ESXi OVA.
Over the years [William Lam] has created very useful OVAs and PowerCLI scripts to quickly deploy Nested ESXi VMs and vCenter. The latest version of the Nested ESXi OVA is 8.0U3c and can be found on the Broadcom Support Portal under [Free Downloads], Flings, Nested ESXi Virtual Appliance -> <version>
Although still very useful, the ESXi 8.0U3c release dates back to 12 December 2024 while the latest version (at the moment of writing) is ESXi 8.0U3g from 29 July 2025. See [KB316595 – Build numbers and versions of VMware ESXi/ESX]. This means additional time and work to upgrade each host after deployment.
Now wouldn’t it be cool to have the latest ESXi version available as OVA file? If your answer is yes, then this post is for you! With the heavy lifting already done by William and a bit of help from my engineering colleague Jianguo Guo I managed to create Nested OVAs for ESXi 8.0U3g and ESX 9.0
A high level overview of the steps I took:
- Create a new VM and install and configure ESXi
- Edit the file /etc/rc.local.d/local.sh
- Shutdown ESXi VM
- Enable and configure vApp Options
- Export VM to OVF from vSphere Client or with ovftool
- Update the contents of the .ovf file
- Retrieve the new sha256 hash of .ovf file and update this in the .mf file
- Create OVA file.
Below is a detailed writing of these steps for ESXi 8.0U3g. The same method can be used for ESX 9.
Create VM and install and configure ESXi
Create a new VM with the following specs:
- VM Hardware version 21
- CPU: 4 CPU (1 Socket, 2 Cores
- If you have chosen a lowever VM Hardware version and more CPUs in total are desired, keep the socket count to a minimum to save on required licenses.
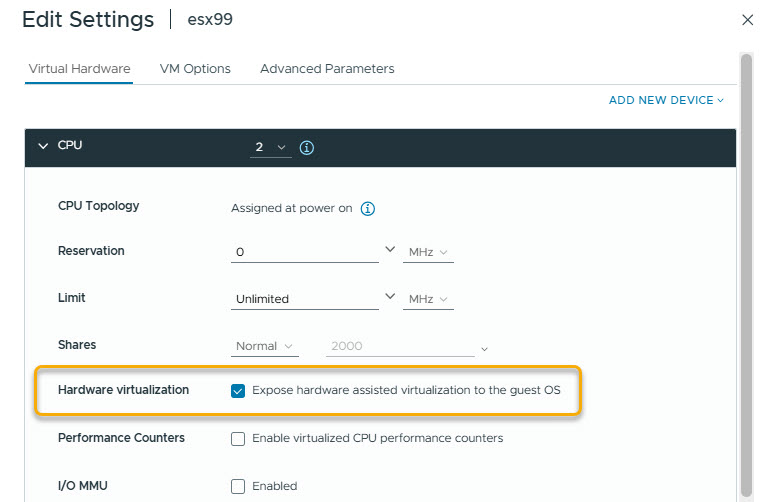
- Make sure to enable “Expose hardware assisted virtualization to the guest OS” under CPU, Hardware virtualization
- Memory: 8 GB RAM
- Hard disks (I used thin provisioned)
- 32 GB OS Disk
- 24 GB vSAN Cache Disk
- 300 GB vSAN Capacity Disk
- 2 Network adapters (VMXNet 3)
Note: If you choose different sized vSAN Disks, make sure to update this in the local.sh script later on.
- Mount the ESXi 8.0U3g ISO file and install ESXi manually.
- From the Nested ESXi VM Console:
- Configure the network settings as you would normally do.
- Enable ESXi Shell and SSH
- SSH to the host and run the following commands:
esxcli system settings advanced set -o /Net/FollowHardwareMac -i 1
grep -i 'uuid' /etc/vmware/esx.conf
sed -i 's/system\/uuid.*//' /etc/vmware/esx.conf
/sbin/auto-backup.sh
The above commands enable the “FollowHardwareMac” setting, resets the ESXi UUID and creates a configuration backup.
Create / Edit the local.sh script that runs once after deployment
While still connected through SSH edit the /etc/rc.local.d/local.sh script. My script is based on William Lam’s rc.local script which can be found [here] with some additional settings. You can update this as desired.
#!/bin/sh ++group=host/vim/vmvisor/boot

# local configuration options

# Note: modify at your own risk!  If you do/use anything in this
# script that is not part of a stable API (relying on files to be in
# specific places, specific tools, specific output, etc) there is a
# possibility you will end up with a broken system after patching or
# upgrading.  Changes are not supported unless under direction of
# VMware support.

# Note: This script will not be run when UEFI secure boot is enabled.

# rc.local
# /sbin/auto-backup.sh
#!/bin/bash -x
# William Lam
# www.virtuallyghetto.com
# Sample Network Customization script for VMware PhotonOS
# https://github.com/lamw/custom-virtual-appliances/blob/master/rc.local
if [ -e /root_ran_customization ]; then
    touch /root_exist
    exit
else
    touch /root_running
    HOSTNAME_PROPERTY=$(vmtoolsd --cmd "info-get guestinfo.ovfEnv" | grep "guestinfo.hostname")
    PASSWORD_PROPERTY=$(vmtoolsd --cmd "info-get guestinfo.ovfEnv" | grep "guestinfo.password")
    IP_ADDRESS_PROPERTY=$(vmtoolsd --cmd "info-get guestinfo.ovfEnv" | grep "guestinfo.ipaddress")
    NETMASK_PROPERTY=$(vmtoolsd --cmd "info-get guestinfo.ovfEnv" | grep "guestinfo.netmask")
    GATEWAY_PROPERTY=$(vmtoolsd --cmd "info-get guestinfo.ovfEnv" | grep "guestinfo.gateway")
    DNS_SERVER_PROPERTY=$(vmtoolsd --cmd "info-get guestinfo.ovfEnv" | grep "guestinfo.dns")
    DNS_DOMAIN_PROPERTY=$(vmtoolsd --cmd "info-get guestinfo.ovfEnv" | grep "guestinfo.domain")
    NTP_PROPERTY=$(vmtoolsd --cmd "info-get guestinfo.ovfEnv" | grep "guestinfo.ntp")
    VLAN_PROPERTY=$(vmtoolsd --cmd "info-get guestinfo.ovfEnv" | grep "guestinfo.vlan")
    SSH_PROPERTY=$(vmtoolsd --cmd "info-get guestinfo.ovfEnv" | grep "guestinfo.ssh")

    ##################################
    ### No User Input, assume DHCP ###
    ##################################
    if [ -z "${HOSTNAME_PROPERTY}" ]; then
    touch /root_noproperty
    #########################
    ### Static IP Address ###
    #########################
    else
        HOSTNAME=$(echo "${HOSTNAME_PROPERTY}" | awk -F 'oe:value="' '{print $2}' | awk -F '"' '{print $1}')
        PASSWORD=$(echo "${PASSWORD_PROPERTY}" | awk -F 'oe:value="' '{print $2}' | awk -F '"' '{print $1}')
        IP_ADDRESS=$(echo "${IP_ADDRESS_PROPERTY}" | awk -F 'oe:value="' '{print $2}' | awk -F '"' '{print $1}')
        NETMASK=$(echo "${NETMASK_PROPERTY}" | awk -F 'oe:value="' '{print $2}' | awk -F '"' '{print $1}')
        GATEWAY=$(echo "${GATEWAY_PROPERTY}" | awk -F 'oe:value="' '{print $2}' | awk -F '"' '{print $1}')
        DNS_SERVER=$(echo "${DNS_SERVER_PROPERTY}" | awk -F 'oe:value="' '{print $2}' | awk -F '"' '{print $1}')
        DNS_DOMAIN=$(echo "${DNS_DOMAIN_PROPERTY}" | awk -F 'oe:value="' '{print $2}' | awk -F '"' '{print $1}')
        NTP=$(echo "${NTP_PROPERTY}" | awk -F 'oe:value="' '{print $2}' | awk -F '"' '{print $1}')
        VLAN=$(echo "${VLAN_PROPERTY}" | awk -F 'oe:value="' '{print $2}' | awk -F '"' '{print $1}')
        SSH=$(echo "${SSH_PROPERTY}" | awk -F 'oe:value="' '{print $2}' | awk -F '"' '{print $1}')

        HOSTNAME=$(echo $HOSTNAME|awk -F ' ' '{print $1}')
        PASSWORD=$(echo $PASSWORD|awk -F ' ' '{print $1}')
        IP_ADDRESS=$(echo $IP_ADDRESS|awk -F ' ' '{print $1}')
        NETMASK=$(echo $NETMASK|awk -F ' ' '{print $1}')
        GATEWAY=$(echo $GATEWAY|awk -F ' ' '{print $1}')
        DNS_SERVER=$(echo $DNS_SERVER|awk -F ' ' '{print $1}')
        DNS_DOMAIN=$(echo $DNS_DOMAIN|awk -F ' ' '{print $1}')
        NTP=$(echo $NTP|awk -F ' ' '{print $1}')
        VLAN=$(echo $VLAN|awk -F ' ' '{print $1}')
        SSH=$(echo $SSH|awk -F ' ' '{print $1}')

        v300=$(esxcli --formatter=csv --format-param=fields='Size,Devfs Path' --format-param=show-header=false storage core device list|sort | tail -2 |head -1 | awk -F ',' '{print $2}'|cut -d/ -f5)
        v24=$(esxcli --formatter=csv --format-param=fields='Size,Devfs Path' --format-param=show-header=false storage core device list|sort | tail -3 |head -1 | awk -F ',' '{print $2}'|cut -d/ -f5)
        /bin/partedUtil setptbl /vmfs/devices/disks/${v300} gpt
        /bin/partedUtil setptbl /vmfs/devices/disks/${v24} gpt
        esxcli vsan storage tag add -d ${v300} -t capacityFlash
        esxcli vsan network ipv4 add -i vmk0

        #esxcli network ip dns server list
        esxcli network ip dns server add -s ${DNS_SERVER}
        esxcli system hostname set --domain=${DNS_DOMAIN}
        echo -e "${PASSWORD}\n${PASSWORD}" | passwd
        esxcli system hostname set --fqdn=${HOSTNAME}
        esxcli network firewall set --enabled=0
        esxcli system ntp set --server=${NTP}
        esxcli system ntp set --enabled=yes
        esxcli network vswitch standard set --vswitch-name=vSwitch0 --mtu 9000
        esxcli network vswitch standard policy security set --vswitch-name vSwitch0 --allow-forged-transmits=true --allow-mac-change=true --allow-promiscuous=true
        esxcli network vswitch standard portgroup set --portgroup-name='Management Network' --vlan-id ${VLAN}
        esxcli network vswitch standard portgroup set --portgroup-name='VM Network'
        chkconfig SSH on > /dev/null 2>&1
        touch /root_ran_customization
        cp /etc/rc.local.d/.#local.sh /etc/rc.local.d/local.sh
        esxcli network ip interface ipv4 set -i vmk0 -g ${GATEWAY} -I ${IP_ADDRESS} -N ${NETMASK} -t static -P false
        esxcli network ip route ipv4 remove -n 0.0.0.0/0.0.0.0 -g 192.168.1.1
        esxcli network ip route ipv4 add --gateway ${GATEWAY} --network 0.0.0.0/0.0.0.0
        /sbin/generate-certificates
        openssl x509 -in /etc/vmware/ssl/rui.crt -out /etc/vmware/ssl/castore.pem
        #/etc/init.d/hostd restart
        #/etc/init.d/vpxa restart
        #To restart all management agents on the host, run the command
        /bin/services.sh restart
        #openssl s_client  -connect localhost:443 |grep notBefore
        /sbin/auto-backup.sh
    fi
fi
exit 0
The script is a bit rough around the edges, but a bit of explanation on the script: VMware Tools is used to retrieve the vApp properties (that we will set later). For example the line vmtoolsd –cmd “info-get guestinfo.ovfEnv” | grep “guestinfo.hostname”), greps the guestinfo.hostname vApp property. This property is later stripped to the exact required content so it can be used in the scripting parts to set the hostname (esxcli system hostname set –fqdn=${HOSTNAME}).
Also note the definition of v300 and v24, corresponding to the size of the virtual disks. As long as the cache disk is smaller then the OS disk and the capacity disk is the largest disk, it should be fine.
- After changes to the local.sh script are done, create a backup of the configuration with
/sbin/auto-backup.sh- Shutdown the VM
- Unset the CD/DVD to datastore ISO if previously configured (Otherwise the mounted iso will be exported during OVF export).
Enable and set vAPP Options
- With the VM shutdown enable the vAPP options on the VM:
- Configure -> Settings, vApp Options -> Edit
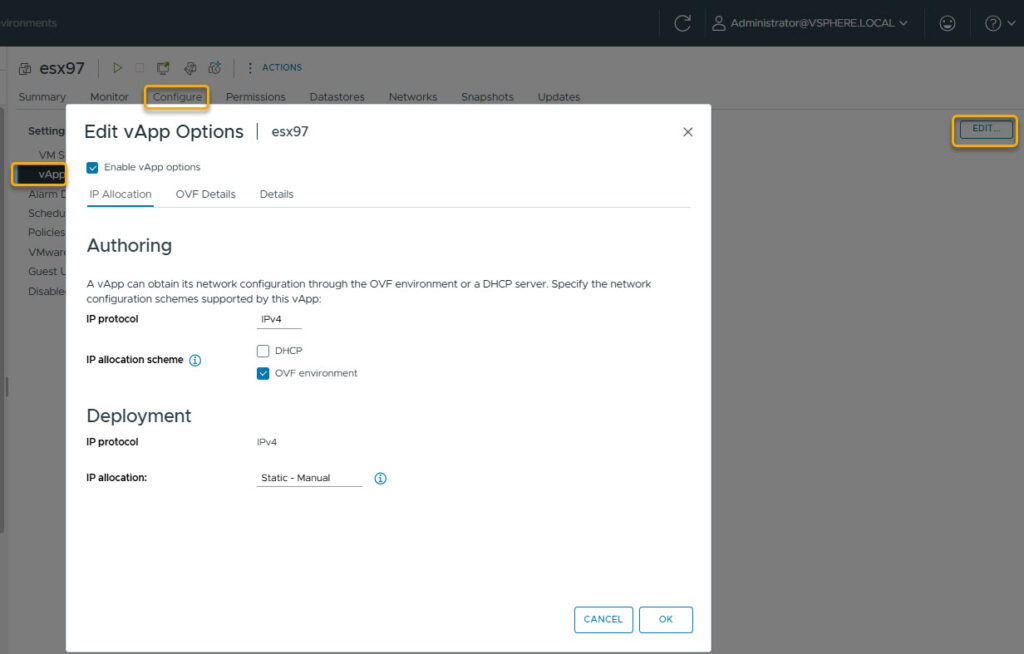
- Select Enable vApp options
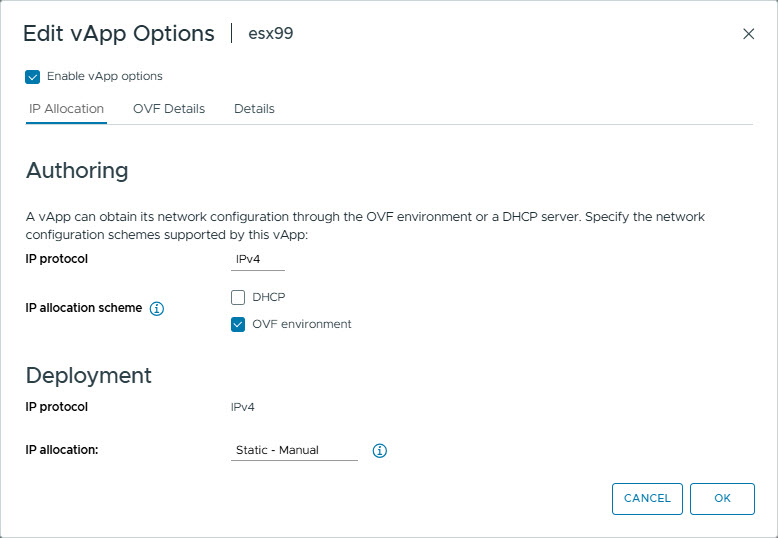
- IP Allocation tab
- Authoring
- IP protocol : IPv4
- IP allocation scheme : OVF environment
- Deployment
- IP protocol : IPv4
- IP allocation scheme : Static – Manual
- OVF Details tab
- OVF environment transport
- Select VMware Tools
- Details tab
- Enter general info / urls as desired
- IP Allocation tab
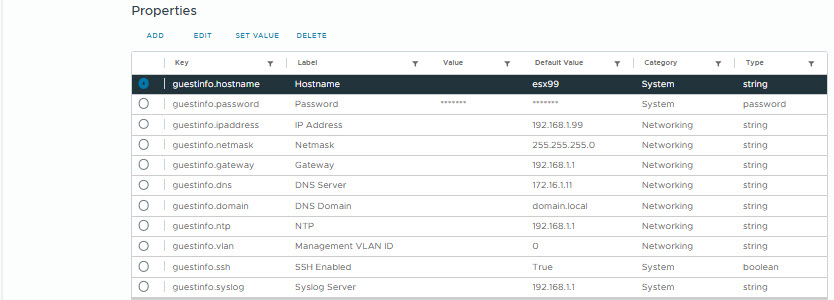
Add the following OVF Properties
| Category | Label | Key ID | Type | Default Value |
| System | Hostname | guestinfo.hostname | String | esx99.infrajedi.local |
| System | Password | guestinfo.password | String | ********* |
| Networking | IP Address | guestinfo.ipaddress | String | 192.168.1.99 |
| Networking | Netmask | guestinfo.netmask | String | 255.255.255.0 |
| Networking | Gateway | guestinfo.gateway | String | 192.168.1.1 |
| Networking | DNS Server | guestinfo.dns | String | 172.16.1.11 |
| Networking | DNS Domain | guestinfo.domain | String | infrajedi.local |
| Networking | NTP | guestinfo.ntp | String | 192.168.1.1 |
| Networking | Management VLAN ID | guestinfo.vlan | String | 0 |
| System | SSH Enabled | guestinfo.ssh | String | True |
| System | Syslog Server | guestinfo.syslog | String | 192.168.1.1 |
Note that it should not matter what default values you enter, so choose something that is easy for your deployments.
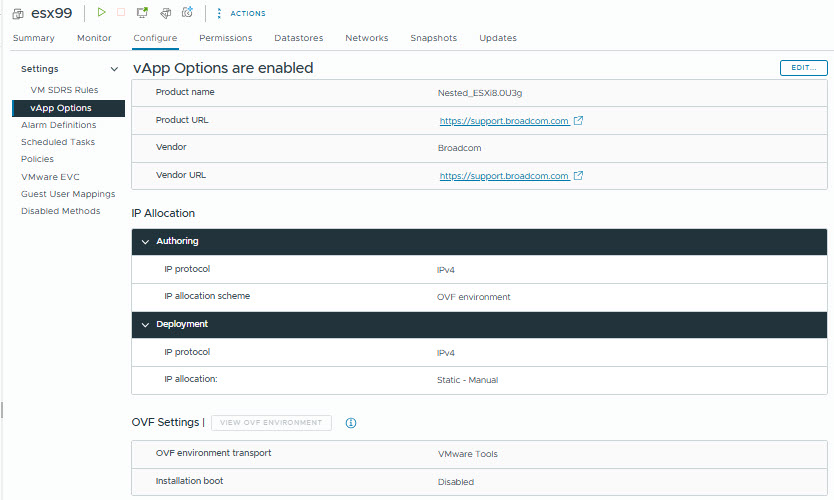
A complete overview of all vAPP settings
Export to OVF with ovftool
- Export the VM from the vSphere Client
- Right click on the VM, Template -> Export OVF Template

- Select : Enable advanced options
- Select : Include extra configuration
As alternative you can export the VM to OVF with the ovftool. See the example command below:
ovftool --X:logFile="C:\Apps\ovftool\ovftool-log.txt" --X:logLevel=verbose "vi://vcsamgmt.infrajedi.local/dc-mgmt/vm/esx99" "C:\Apps\ovftool\ovf\ESXi-8.0U3g.ovf"Where in vi://vcsamgmt.infrajedi.local/dc-mgmt/vm/esx99 :
- vcsamgmt.infrajedi.local is de vcenter hostname
- dc-mgmt is de datacenter name in vCenter
- vm is the default VM placeholder
- esx99 is the name of the VM to be exported as OVF.
Update .ovf file
Add the following lines to the generated OVF file in the <ExtraConfig> section. I recommend using an editor like Notepad++, set the the End of Line (EOL) document format to Unix (LF) and make sure the file is aligned correctly.
<vmw:ExtraConfig ovf:required="false" vmw:key="disk.enableuuid" vmw:value="TRUE"/>
      <vmw:ExtraConfig ovf:required="false" vmw:key="ehci.pcislotnumber" vmw:value="34"/>
      <vmw:ExtraConfig ovf:required="false" vmw:key="ethernet0.bsdname" vmw:value="en0"/>
      <vmw:ExtraConfig ovf:required="false" vmw:key="ethernet0.connectiontype" vmw:value="nat"/>
      <vmw:ExtraConfig ovf:required="false" vmw:key="ethernet0.displayname" vmw:value="Ethernet"/>
      <vmw:ExtraConfig ovf:required="false" vmw:key="ethernet0.filter4.name" vmw:value="dvfilter-maclearn"/>
      <vmw:ExtraConfig ovf:required="false" vmw:key="ethernet0.filter4.onfailure" vmw:value="failOpen"/>
      <vmw:ExtraConfig ovf:required="false" vmw:key="ethernet0.linkstatepropagation.enable" vmw:value="FALSE"/>
      <vmw:ExtraConfig ovf:required="false" vmw:key="ethernet0.pcislotnumber" vmw:value="33"/>
      <vmw:ExtraConfig ovf:required="false" vmw:key="ethernet1.filter4.name" vmw:value="dvfilter-maclearn"/>
      <vmw:ExtraConfig ovf:required="false" vmw:key="ethernet1.filter4.onfailure" vmw:value="failOpen"/>
      <vmw:ExtraConfig ovf:required="false" vmw:key="gui.fullscreenatpoweron" vmw:value="FALSE"/>
      <vmw:ExtraConfig ovf:required="false" vmw:key="gui.viewmodeatpoweron" vmw:value="windowed"/>
      <vmw:ExtraConfig ovf:required="false" vmw:key="hgfs.linkrootshare" vmw:value="TRUE"/>
      <vmw:ExtraConfig ovf:required="false" vmw:key="hgfs.maprootshare" vmw:value="TRUE"/>
      <vmw:ExtraConfig ovf:required="false" vmw:key="hpet0.present" vmw:value="TRUE"/>
      <vmw:ExtraConfig ovf:required="false" vmw:key="isolation.tools.hgfs.disable" vmw:value="FALSE"/>
      <vmw:ExtraConfig ovf:required="false" vmw:key="msg.autoanswer" vmw:value="true"/>
      <vmw:ExtraConfig ovf:required="false" vmw:key="parallel0.autodetect" vmw:value="FALSE"/>
      <vmw:ExtraConfig ovf:required="false" vmw:key="pcibridge0.pcislotnumber" vmw:value="17"/>
      <vmw:ExtraConfig ovf:required="false" vmw:key="pcibridge0.present" vmw:value="TRUE"/>
      <vmw:ExtraConfig ovf:required="false" vmw:key="pcibridge4.functions" vmw:value="8"/>
      <vmw:ExtraConfig ovf:required="false" vmw:key="pcibridge4.pcislotnumber" vmw:value="21"/>
      <vmw:ExtraConfig ovf:required="false" vmw:key="pcibridge4.present" vmw:value="TRUE"/>
      <vmw:ExtraConfig ovf:required="false" vmw:key="pcibridge4.virtualdev" vmw:value="pcieRootPort"/>
      <vmw:ExtraConfig ovf:required="false" vmw:key="pcibridge5.functions" vmw:value="8"/>
      <vmw:ExtraConfig ovf:required="false" vmw:key="pcibridge5.pcislotnumber" vmw:value="22"/>
      <vmw:ExtraConfig ovf:required="false" vmw:key="pcibridge5.present" vmw:value="TRUE"/>
      <vmw:ExtraConfig ovf:required="false" vmw:key="pcibridge5.virtualdev" vmw:value="pcieRootPort"/>
      <vmw:ExtraConfig ovf:required="false" vmw:key="pcibridge6.functions" vmw:value="8"/>
      <vmw:ExtraConfig ovf:required="false" vmw:key="pcibridge6.pcislotnumber" vmw:value="23"/>
      <vmw:ExtraConfig ovf:required="false" vmw:key="pcibridge6.present" vmw:value="TRUE"/>
      <vmw:ExtraConfig ovf:required="false" vmw:key="pcibridge6.virtualdev" vmw:value="pcieRootPort"/>
      <vmw:ExtraConfig ovf:required="false" vmw:key="pcibridge7.functions" vmw:value="8"/>
      <vmw:ExtraConfig ovf:required="false" vmw:key="pcibridge7.pcislotnumber" vmw:value="24"/>
      <vmw:ExtraConfig ovf:required="false" vmw:key="pcibridge7.present" vmw:value="TRUE"/>
      <vmw:ExtraConfig ovf:required="false" vmw:key="pcibridge7.virtualdev" vmw:value="pcieRootPort"/>
      <vmw:ExtraConfig ovf:required="false" vmw:key="proxyapps.publishtohost" vmw:value="FALSE"/>
      <vmw:ExtraConfig ovf:required="false" vmw:key="remotedisplay.vnc.enabled" vmw:value="FALSE"/>
      <vmw:ExtraConfig ovf:required="false" vmw:key="replay.supported" vmw:value="FALSE"/>
      <vmw:ExtraConfig ovf:required="false" vmw:key="scsi0.pcislotnumber" vmw:value="16"/>
      <vmw:ExtraConfig ovf:required="false" vmw:key="scsi0:1.virtualSSD" vmw:value="true"/>
      <vmw:ExtraConfig ovf:required="false" vmw:key="scsi0:2.virtualSSD" vmw:value="true"/>
      <vmw:ExtraConfig ovf:required="false" vmw:key="serial0.autodetect" vmw:value="FALSE"/>
      <vmw:ExtraConfig ovf:required="false" vmw:key="usb.pcislotnumber" vmw:value="32"/>
      <vmw:ExtraConfig ovf:required="false" vmw:key="uuid.action" vmw:value="create"/>
      <vmw:ExtraConfig ovf:required="false" vmw:key="virtualhw.productcompatibility" vmw:value="hosted"/>
      <vmw:ExtraConfig ovf:required="false" vmw:key="vmci0.pcislotnumber" vmw:value="35"/>
      <vmw:ExtraConfig ovf:required="false" vmw:key="vmotion.checkpointfbsize" vmw:value="65536000"/>
      <vmw:ExtraConfig ovf:required="false" vmw:key="migrate.hostLog" vmw:value="./Nested_ESXi80u3.log"/>
For a full example, see my [Github] page
Check the new hash of .ovf file and update in the .mf file
Since the OVF file has changed, the hash of the file has also changed and this needs to be updated in the .mf file.
- To get the sha256 hash of the OVF file you can use the Powershell command:
(get-FileHash -Algorithm SHA256 "C:\Apps\ovftool\ovf\ESXi-8.0U3g\ESXi-8.0U3g.ovf").Hash.ToLower()Edit the .mf file and update the hash value
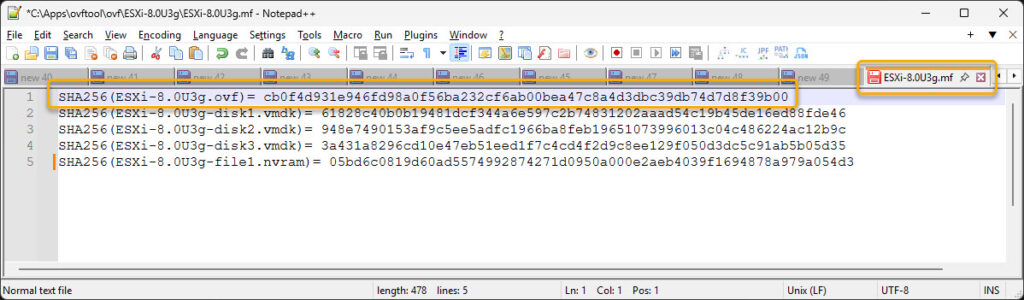
For a full example, see my [Github] page
Create OVA file.
- When all of the above steps are done, we can finally create an OVA file with the ovftool. Use the following command:.
ovftool --allowExtraConfig "C:\Apps\ovftool\ovf\ESXi-8.0U3g\ESXi-8.0U3g.ovf" "C:\Apps\ovftool\ovf\ESXi-8.0U3g\ESXi-8.0U3g.ova"Final words
You should now be able to deploy an new Nested ESXi host with the generated OVA file and provided the settings as desired.


1 Response