Aria Automation – Change IP address
Since I am reorganizing my homenetwork, I wanted to move the Aria Products in their own network and created an extra VLAN with another IP subnet. In this blog I will share my experience with changing the IP address of my Aria Automation appliance. The starting situation is as follows:
- Single Node, non-clustered Aria Automation 8.18.1. Initial deployment started with 8.18.0
- DNS Name: vra.infrajedi.local
- IP address: 192.168.1.220
- Certificate: I am using a wildcard certificate (not a best practice), so no changes are needed.
- Firewall: Aria Automation is deployed in the same network as vCenter and the rest of the Aria products, no firewall rules configured.
The new IP address will be 172.16.2.220. Firewall is opened (for now) to allow traffic between vCenter and Aria Products so no changed needed for me.
In a large / enterprise environment you may need to:
- Plan time to work together with the team that manages DNS.
- update and replace Certificates (if you have IP addresses in the SAN)
- update firewall rules for the new Aria Automation IP address.
As usual, before you start create a snapshot of the Aria Automation appliance(s).
SSH to the Aria Automation appliance and check the service status: vracli service status
root@vra [ ~ ]# vracli service status
Service                       State    Health    Nodes    CPU     Memory
----------------------------  -------  --------  -------  ------  -------
Infrastructure

docker-artifactory            Started  Healthy   1/1      0.01 %  14 MB
health-reporting-service      Started  Healthy   1/1      0.0 %   2 MB
kube-dns                      Started  Healthy   1/1      0.03 %  25 MB
kube-flannel-ds               Started  Healthy   1/1      0.03 %  23 MB
kubelet-rubber-stamp          Started  Healthy   1/1      0.01 %  18 MB
postgres                      Started  Healthy   1/1      0.62 %  1936 MB
predictable-pod-scheduler     Started  Healthy   1/1      0.29 %  4 MB
proxy-service                 Started  Healthy   1/1      0.01 %  12 MB
rabbitmq-ha                   Started  Healthy   1/1      1.22 %  578 MB

Applications

abx-service                   Started  Healthy   1/1      0.09 %  1775 MB
adapter-host-service          Started  Healthy   1/1      0.02 %  644 MB
approval-service              Started  Healthy   1/1      0.2 %   964 MB
catalog-service               Started  Healthy   1/1      0.1 %   2054 MB
ccs-gateway                   Started  Healthy   1/1      0.04 %  584 MB
ccs-infra-eas                 Started  Healthy   1/1      0.31 %  1607 MB
ccs-k3s                       Started  Healthy   1/1      0.66 %  346 MB
ccs-webhook-authentication    Started  Healthy   1/1      0.03 %  585 MB
cgs-service                   Started  Healthy   1/1      0.11 %  949 MB
cmx-service                   Started  Healthy   1/1      0.06 %  740 MB
codestream                    Started  Healthy   1/1      0.05 %  833 MB
ebs                           Started  Healthy   1/1      0.47 %  1058 MB
form-service                  Started  Healthy   1/1      0.13 %  848 MB
hcmp-service                  Started  Healthy   1/1      0.06 %  636 MB
idem-resources-provider       Started  Healthy   1/1      0.02 %  492 MB
idem-service                  Started  Healthy   1/1      0.07 %  807 MB
idem-service-event-ingestion  Started  Healthy   1/1      0.01 %  355 MB
idem-service-task-manager     Started  Healthy   1/1      0.1 %   358 MB
idem-service-worker           Started  Healthy   1/1      0.08 %  131 MB
identity-service              Started  Healthy   1/1      0.03 %  768 MB
migration-service             Started  Healthy   1/1      0.28 %  1131 MB
no-license                    Started  Healthy   1/1      0.01 %  9 MB
project-service               Started  Healthy   1/1      0.06 %  875 MB
provisioning-service          Started  Healthy   1/1      0.14 %  2042 MB
relocation-service            Started  Healthy   1/1      0.06 %  584 MB
tango-blueprint-service       Started  Healthy   1/1      0.23 %  1957 MB
tango-vro                     Started  Healthy   1/1      0.02 %  879 MB
terraform-service             Started  Healthy   1/1      0.05 %  505 MB
ui                            Started  Healthy   1/1      0.01 %  62 MB
user-profile-service          Started  Healthy   1/1      0.02 %  585 MB
vco                           Started  Healthy   1/1      0.04 %  2645 MB
All Infrastructure and Applications services should be in a Healthy state as shown above.
To configure the new IP address, you can use the vracli command. According to the documentation, the command should look like this:
vracli network alternative-ip set --dns DNSIPaddress1,DNSIPaddress2IPV4_addressGateway_IPV4_addressI must say this isn’t formatted very nice and seems to miss some spaces. After a couple of tries this was the correct command for me. Note the required CIDR notation for the desired IP address:
vracli network alternative-ip set --dns 172.16.1.11,172.16.1.12 172.16.2.220/24 172.16.2.1Changing the order of parameters does not seem to make any difference:
vracli network alternative-ip set 172.16.2.220/24 172.16.2.1 --dns 172.16.1.11,172.16.1.12You can check if the proposed changes are correct by running the vracli network command without options:
root@vra [ ~ ]# vracli network alternative-ip
address: 172.16.2.220/24
gateway: 172.16.2.1
dns: ['172.16.1.11', '172.16.1.12']
Note: If you are working with clustered Aria Automation, this procedure has to be repeated on all nodes.
Shutdown vRA services by running command:
/opt/scripts/deploy.sh --shutdownOpen the VM Console to your Aria Automation appliance, since after running the next command, the SSH sessions gets disconnected. Swap the IP address with the command:
root@vra [ ~ ]# vracli network alternative-ip swap
This command is intended to run during SRM recovery. Use --force to run the swap command manually.
root@vra [ ~ ]# vracli network alternative-ip swap --force
Change the DNS entry to the new IP address (In Infoblox, Active Directory, whatever you use).
Note1: Pay special attention if you are using a multi-tenancy setup!
Note2: Be sure to update PTR records accordingly!
Change the vRA VM portgroup in vCenter.
Reboot the vRA appliance with command:
shutdown -r nowThe vRA appliance should now come back up with the new IP address
Check if you can ping the appliance and if DNS works (also check reverse lookup, there might be a leftover PTR record pointing to the old IP!).
Start the vRA Services with the deploy script:
/opt/scripts/deploy.shUnfortunately, in my case the services did not all Start and on the VM console there is an error message:
[FAILED] failed to start squid caching proxy
Checking service status shows that some of the Infrastructure services and none of the Application services have not started :
root@vra [ ~ ]# vracli service status
Service                       State    Health    Nodes    CPU     Memory
----------------------------  -------  --------  -------  ------  --------
Infrastructure

docker-artifactory            Stopped
health-reporting-service      Started  Healthy   1/1      0.01 %  8 MB
kube-dns                      Started  Healthy   1/1      0.03 %  67 MB
kube-flannel-ds               Started  Healthy   1/1      0.07 %  58 MB
kubelet-rubber-stamp          Started  Healthy   1/1      0.01 %  18 MB
postgres                      Stopped
predictable-pod-scheduler     Started  Healthy   1/1      0.38 %  46 MB
proxy-service                 Stopped
rabbitmq-ha                   Stopped

Applications

abx-service                   Stopped
adapter-host-service          Stopped
I waited a while, but nothing seemed to happen, so I decided to run the deploy script again:
/opt/scripts/deploy.shThis time the appliance came back up (might have to do with my configuration).
I ran a couple of quick checks in Aria Automation and everything seemed to work.
Finally check the Aria Automation status in Aria Suite Lifecycle (ASLCM).
Login and go to the environment where Aria Automation is deployed. As you can see in the screenshot it still shows the old IP address.
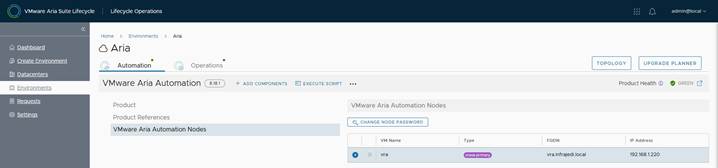
This can simply be resolved by running an inventory sync after which the new IP address is shown:
That it for this blog. Hope it was useful.


1 Response