Getting started with vRA SaltStack Config – part 1
I finally got some time to work with vRA Saltstack Config (SSC) and want to share my experience in this blogpost. My starting point is:
- vRSLCM 8.4.1.1 Patch 2 with VIDM 3.3.5 and vRA 8.5.1
- Ubuntu 18.04 (Bionic Beaver) Cloud ova image on a local webserver (or Content library). You can find the latest [here]:
- Microsoft CA with generated certificates for vRSLCM, VIDM, vRA and SSC.
- Certificates imported in the vRSLCM Locker
Some notes:
- Please make sure your DNS and certificates are setup correct.
- In vRealize Automation, disable FIPS mode for SaltStack integrations.
- The vRSLCM installation method is a standard deployment and not recommended for production grade systems with more than 1,000 nodes.
- The system requirements for a standard SSSC deployment are 16 vCPU, 32GB, 260GB storage.
vRA SaltStack Config Deployment
- In vRSLCM go to Environments, Click on the 3 dots and Click Add Product.
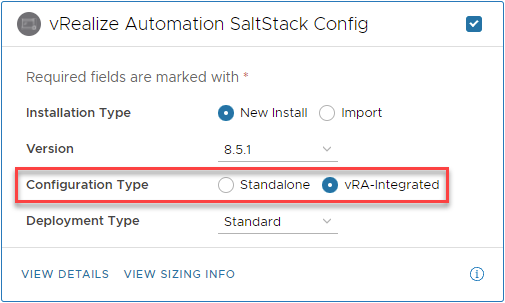
- Select vRealize Automation SaltStack Config
- Select vRA-integrated
- Click Next, Agree with the terms and Click Next again.
- Choose the license from the Locker
- Note: SSC Standalone does not accept a vRealize Suite License and will throw an error message “No License applied to vRealize Automation SaltStack Config”
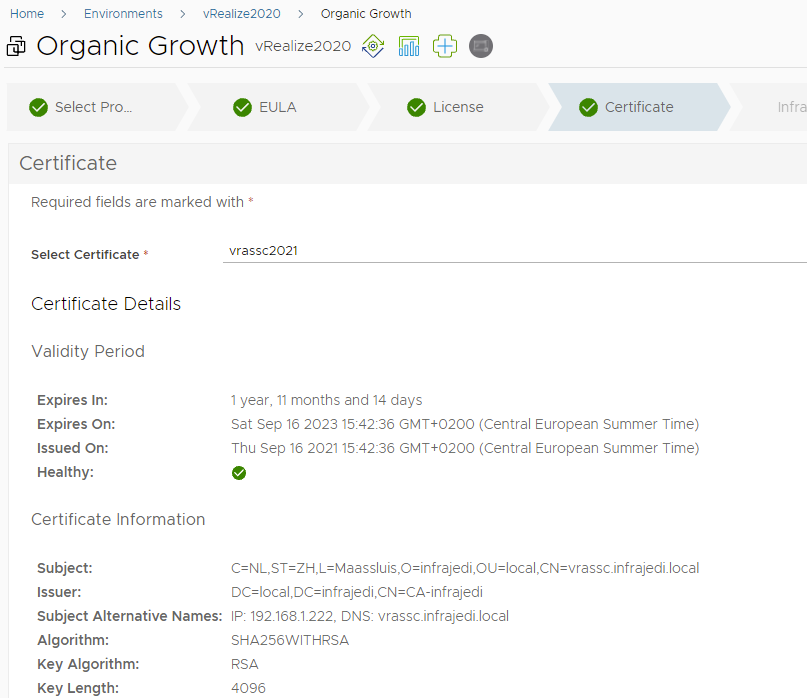
- Click Next and select the vRA SSC Certificate. In my case a signed certificate from my private CA
- Click Next and select where to deploy your vRA SSC VM in your Infra.
- Make sure to select Integrate with Identity Manager

- Click Next, Enter the Network details and Click Next. Make sure the DNS server is correct.
On the product Page
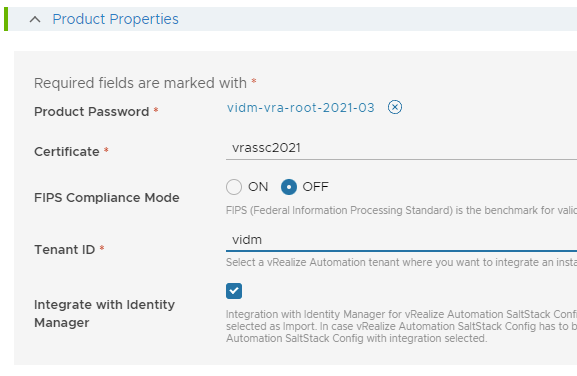
- Double check if you have selected the correct certificate
- Disable FIPS Compliance Mode
- Select Tenant vRA tenant where you want to integrate vRA SSC
- Check/Select Integrate with Identity Manager
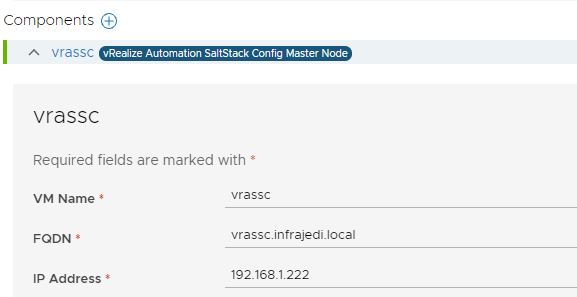
On the component part enter your vRA SSC VM Name, FQDN and IP Address
- Click Next and run the Precheck.
- If everything is okay, click Next and Submit
- When the deployment has finished, it might be wise to create a snapshot before proceeding with the next steps.
First look
After the deployment of SSC login to your vRA Console. You should now notice a couple of new items.
- In the Cloud Service Console you can see SaltStack Config
- In Cloud Assembly, under Infrastructure, Integrations you can see vssc_vidm
- In Cloud Assembly, under Design, Property Groups you can see a Property Group SaltStackConfiguration containing the masterAddress and masterFingerPrint property.
From the Cloud Service Console, got to Identity & Access Management and add your user or group to the SaltStack Superuser and/or Saltstack Administrator group.
Now Let’s start with opening SaltStack Config from the Cloud Service Console!
Unfortunately, in my case, the vRA SSC interface returns a blank page. You may also get a 403 Error.
If you login to vrassc via ssh and have a look at /var/log/raas/raas you will notice an error message “[SSL: CERTIFICATE_VERIFY_FAILED] certificate verify failed: self signed certificate in certificate chain”
Fortunately this issue is mentioned in the [documentation].
To fix the issue, you must import your root CA certificate and add it to trusted root CA file by adding it to the ca-bundle.crt file. I have followed the documentation, but since this might still be tricky, here are the steps I followed.
If you have generated certificates for vRA, vRA SSC you should probably have the root certificate in PEM format available, otherwise, it can be picked up from your browser.
- Click on the Lock symbol, Certificate, Certificate Path.
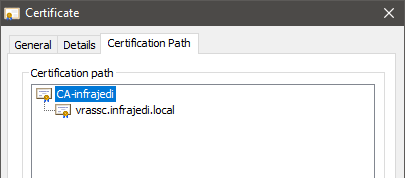
- Select your CA certificate and click View Certificate, Details.
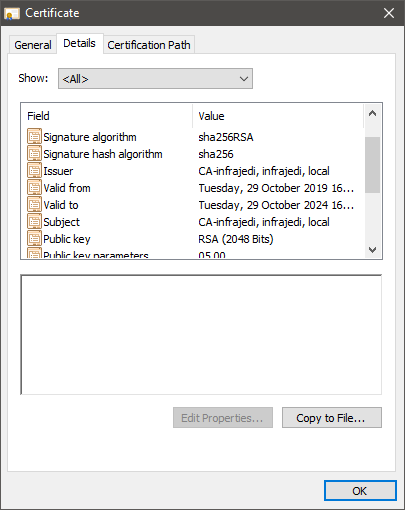
- Click Copy to File, Select Base-64 Encoded
Copy the certificate file to your vRA SSC machine or create a new file and copy/paste the contents. When you copy/paste, make sure there is no line break after —–END CERTIFICATE—–
root@vrassc [ ~ ]# vi ca01.pem
root@vrassc [ ~ ]# cat ca01.pem
-----BEGIN CERTIFICATE-----
MIIDbTCCAlWgAwIBAgIQMPCNgYYGK6pPm8M+9cnxwzANBgkqhkiG9w0BAQsFADBJ
MRUwEwYKCZImiZPyLGQBGRYFbG9jYWwxGTAXBgoJkiaJk/IsZAEZFglpbmZyYWpl
<cutted here>
KrH7lZkqpQL2531Y9/CE1SraXOUVDJ1AmRkoYuS6J15snIxNqn8nhx/7v1jegdMw
+JsZsSrTljvSy5Q+QL8yPaI=
-----END CERTIFICATE-----
You can validate the certificate with command:
openssl x509 -in ca01.pem -text -nooutIf the certificate is valid, you can now add it to trusted root CA file with command (this will add the contents of your ca file to the existing ca-bundle.crt file):
cat ca01.pem >> /etc/pki/tls/certs/ca-bundle.crtYour root CA certificate should now show up at the end of the ca-bundle.crt file.
Next, we need to edit the raas.service file /usr/lib/systemd/system/raas.service. Add the following line above the ExecStatePre line
Environment=REQUESTS_CA_BUNDLE=/etc/pki/tls/certs/ca-bundle.crt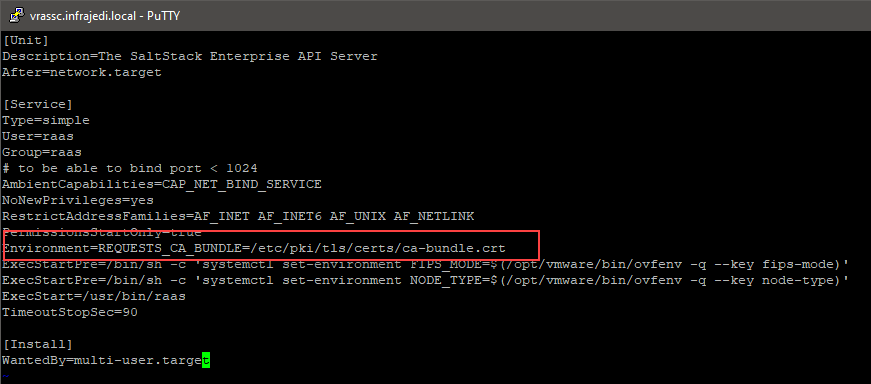
Restart the raas services
systemctl daemon-reload
systemctl stop raas
rm /var/log/raas/raas
systemctl start raas
You can check the status of the raas service with systemctl status raas, or follow the log with tail -f /var/log/raas/raas
Go back to your Cloud Service Console and Click on SaltStack Config.
You should now be presented with the vRA SSC Management Interface
On to part two where I show how to deploy a Minion and configure a vRA Cloud Template with vRA SSC integration.
Another possible Quick & Dirty workaround if you are using self-signed certs from vRSLCM:
Edit the file /etc/raas/raas and add the following to the end:
#vra bypass validate ssl
vra:
  validate_ssl: False
Stop and start the raas service as described above.
External Links and information
Installing and Configuring SaltStack Config
How to add the SaltStack Config minion in vRealize Automation Cloud Assembly designs
Training: VMware vRealize Automation SaltStack Config: Deploy & Manage [V8.4]