Generate and replace Log Insight Certificates
Introduction
This blogpost is about various options and corresponding tasks to generate and replace vRealize Log Insight (aka Aria Operations for Logs) certificates. Experience and instructions in this blog are based on a standard vSphere Environment (no VCF, no NSX-T): vCenter 7.0u3k, vRealize Lifecycle Manager (vRSLCM) 8.10 Product Support Pack 8, vRealize Log Insight (vRLI) 8.10.2. My vRLI environment consists of 3 nodes with the following IP/DNS configuration:
| Role | FQDN | IP |
| vRLI Integrated Load Balancer (ILB) | vrli.infrajedi.local | 192.168.1.230 |
| vRLI Node 1 | vrli01.infrajedi.local | 192.168.1.231 |
| vRLI Node 2 | vrli02.infrajedi.local | 192.168.1.232 |
| vRLI Node 3 | vrli03.infrajedi.local | 192.168.1.233 |
Always make sure to check the latest VMware documentation:
- Log Insight documentation
- VMware Validated Solution (VVS) for Intelligent Logging (previously VMware Validate Design (VVD))
Some points to call out from the documentation related to load balancing and certificates:
- The vRealize Log Insight primary and worker nodes must have the same certificates. Otherwise, the vRealize Log Insight Agents configured to connect through SSL reject the connection.
- When uploading a CA-signed certificate to vRealize Log Insight primary and worker nodes, set the Common Name to the ILB FQDN (or IP address) during the certificate generation request.
- The CommonName contains a wildcard or exact match for the primary node or FQDN of the virtual IP address. Optionally, all other IP addresses and FQDNs are listed as subjectAltName.
- The private key is not encrypted by a pass phrase.
- Best practice from the VVS: Use a CA-signed certificate containing the vRealize Log Insight cluster node FQDNs, and the ILB FQDN in the SAN attributes, when deploying vRealize Log Insight in each VMware Cloud Foundation instance.
This blogpost describes the following tasks:
- Use vRSLCM to generate a Certificate or Certificate Signing Request (CSR)
- Use OpenSSL to generate a Certificate or Certificate Signing Request (CSR)
- Import a certificate in vRSLCM
- Replace vRSLCM integrated vRLI Certificates – option 1
- Replace vRSLCM integrated vRLI Certificates – option 2
- Manual replace vRLI Certificates
Use vRSLCM to generate a Certificate or CSR
vRSLCM is great in many ways for managing vRealize products. The Locker functionality of vRSLCM can be used to manage Passwords, Licenses and Certificates. More specific, the Locker can be used to generate Certificates and Certificate Signing Requests (CSR).
Below are the steps to create a Certificate or CSR. The CSR can be used to get a signed certificate from your Root CA. The screens for both types of requests are the same:
=> Locker, Certificates -> Generate or Generate CSR
- Name : This is just a name that vRSLCM uses.
- Common Name : <FQDN of the vRLI ILB>
- Organization : <your organization>
- Organization Unit : <your organization unit>
- Locality : <City>
- State : <State/Province>
- Key Length : 2048 / 4096
- Server Name : The vRLI ILB FQDN and all vRLI Node FQDNs”
- IP Address : If you don’t have DNS records setup for your nodes, you can enter the IP Addresses here.
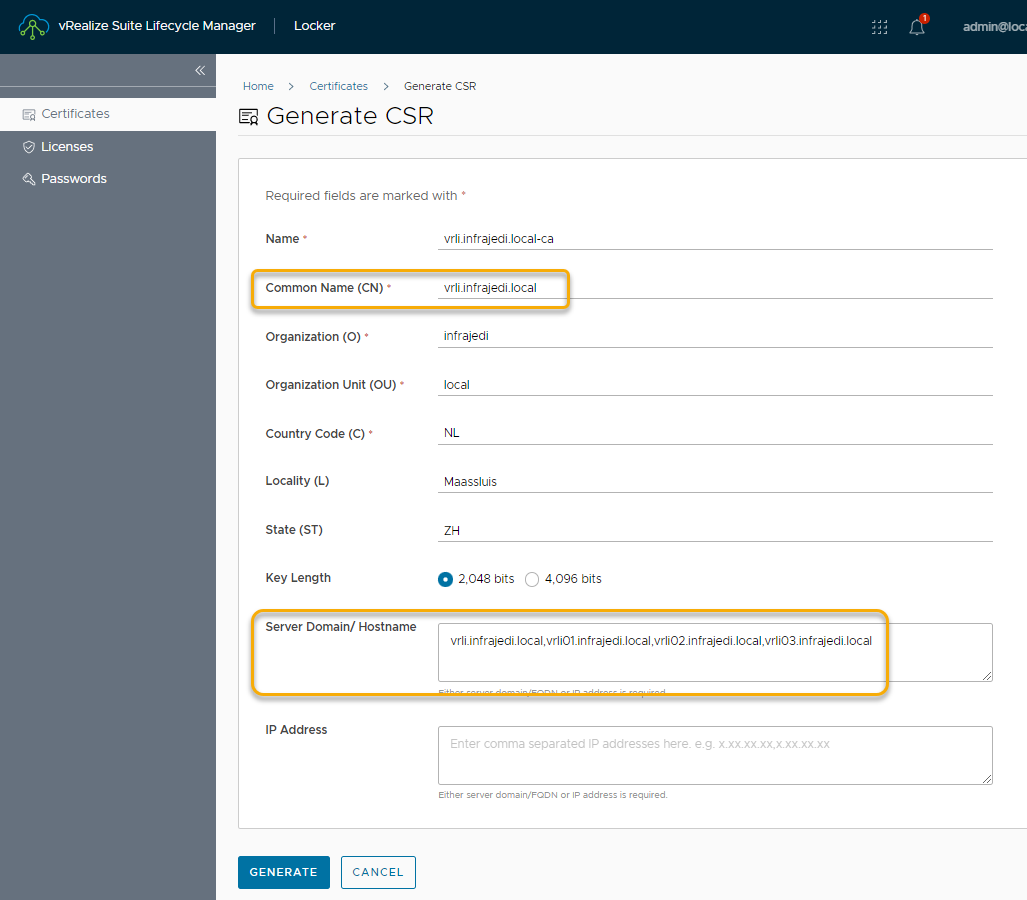
- Click Generate
If you chose “generate CSR”, you are asked where to save the CSR file. The generated CSR file contains the CSR itself AND the private key. You can open the file in a text editor like Notepad++ and split the contents in two files.
-----BEGIN CERTIFICATE REQUEST-----
MIIDdDCCAlwCAQAwcTEdMBsGA1UEAwwUdnJsaS5pbmZyYWplZGkubG9jYWwxDjAM
...
xZR5wa5fiBJpasCH2KzMewFINSTpnd6W
-----END CERTIFICATE REQUEST-----
-----BEGIN PRIVATE KEY-----
MIIEvgIBADANBgkqhkiG9w0BAQEFAASCBKgwggSkAgEAAoIBAQDJHBdSBzs9lZ0B
...
g+h1FRn/ZaPSfnuIUmA9L1Mf
-----END PRIVATE KEY-----
Send the file with only the CSR contents to your CA Administrator (or use it on your own CA) and keep the file with the private key somewhere safe (for later use).
If you chose generate Certificate, the Certificate will be stored in the vRSLCM Locker and it can be directly used for product deployments or Certificate replacements.
Use OpenSSL to generate a Certificate or CSR
If you do not have vRSLCM deployed, you can generate a certificate or CSR by making use of the openssl tool. It is installed by default on vRLI and most other vRealize products, but can also be downloaded and installed on Linxu, Mac or Windows.
=> SSH to one of the vRLI nodes.
- Create a new file “vrlicert.cfg”.
- Add contents below and replace values with your own values under [alt_names] and [req_distinguished_name]
- alt_names should contain the DNS entries (and/or IP address) of all vRLI Nodes (in the example below I have also added the vRLI ILB FQDN).
- commonName should have the value for the vRLI ILB FQDN.
[req]
default_bits = 2048
default_keyfile = rui.key
distinguished_name = req_distinguished_name
encrypt_key = no
prompt = no
string_mask = nombstr
req_extensions = v3_req

[v3_req]
basicConstraints = CA:FALSE
keyUsage = digitalSignature, keyEncipherment, dataEncipherment, nonRepudiation
extendedKeyUsage = serverAuth, clientAuth
subjectAltName = @alt_names

[alt_names]
DNS.1 = vrli.infrajedi.local
DNS.2 = vrli01.infrajedi.local
DNS.3 = vrli02.infrajedi.local
DNS.4 = vrli03.infrajedi.local

[req_distinguished_name]
countryName = NL
stateOrProvinceName = ZH
localityName = Maassluis
0.organizationName = infrajedi
organizationalUnitName = local
commonName = vrli.infrajedi.local
- Generate the private key (vrlicert.key) and certificate (vrlicert.crt) with the openssl command:
openssl req -x509 -nodes -newkey 2048 -keyout vrlicert.key -out vrlicert.crt -config vrlicert.cfg -days 3650 -extensions v3_reqNote that you can set the expiry days
U can use the cat command to show and copy the contents of the private key and certificate.
U can use the openssl command below to view a more detailed view of the certificate:
openssl x509 -in vrlicert.crt -textOn Windows u can use the certutil tool to view a more detailed view of the certificate:
certutil vrlicert.crtYou can also use the same .cfg file to generate a CSR. Use the openssl command below for CSR generation:
openssl req -new -nodes -out vrlicert.csr -keyout vrlicert2.key -config vrlicert.cfgThe CSR can be viewed with openssl command:
openssl req -in vrlicert.csr -textOn Windows:
certutil vrlicert.csrReference: https://www.xolphin.com/support/OpenSSL/Frequently_used_OpenSSL_Commands
Import a Certificate in vRSLCM
If you have received a certificate from your CA Administrator or created your own certificate, you can import this in the vRSLCM Locker for use during product deployments.
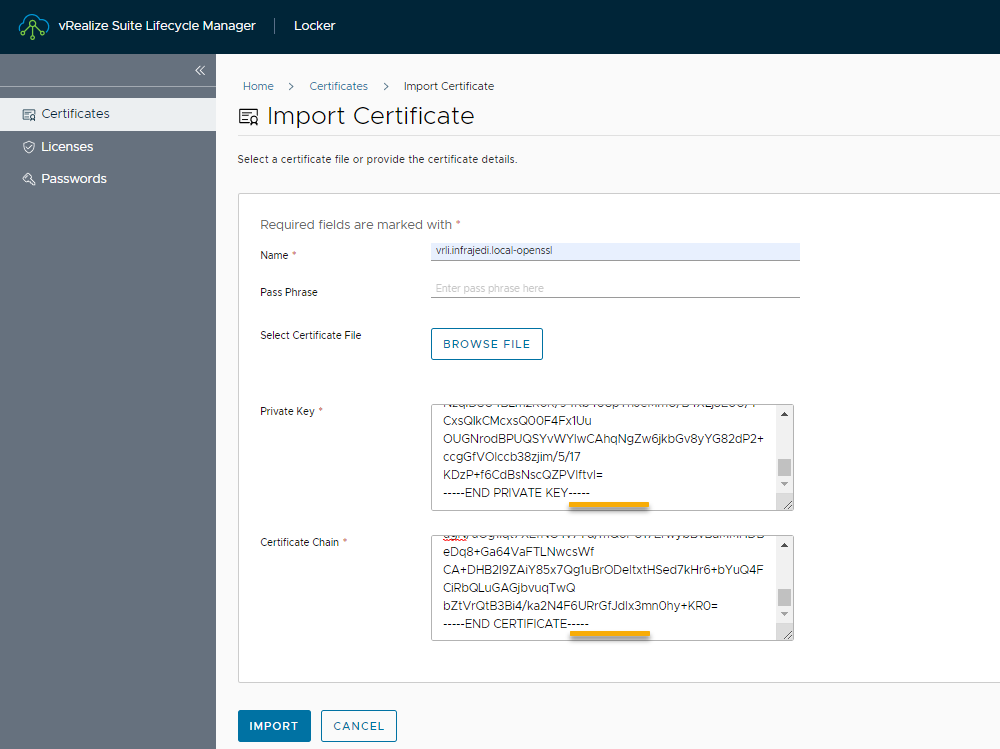
=> Locker, Certificates, Import
- Paste the contents of the Private Key
- Past the contents of the Certificate.
- If you import a CA signed certificate, the complete chain of certificates must be copied in the Certificate Chain field in this order: Primary Certificate, Intermediate Certificate, Root Certificate
- Make sure no Line breaks exist after ending the key/certificate contents.
For certificate chain it looks like this on the cut/merge:
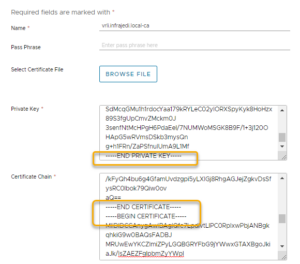
Also see this reference
Replace vRSLCM integrated vRLI Certificates – option 1
If your vRLI is deployed from- or imported to vRLSCM it is easy to replace the certificates. This section describes the first option to accomplish this.
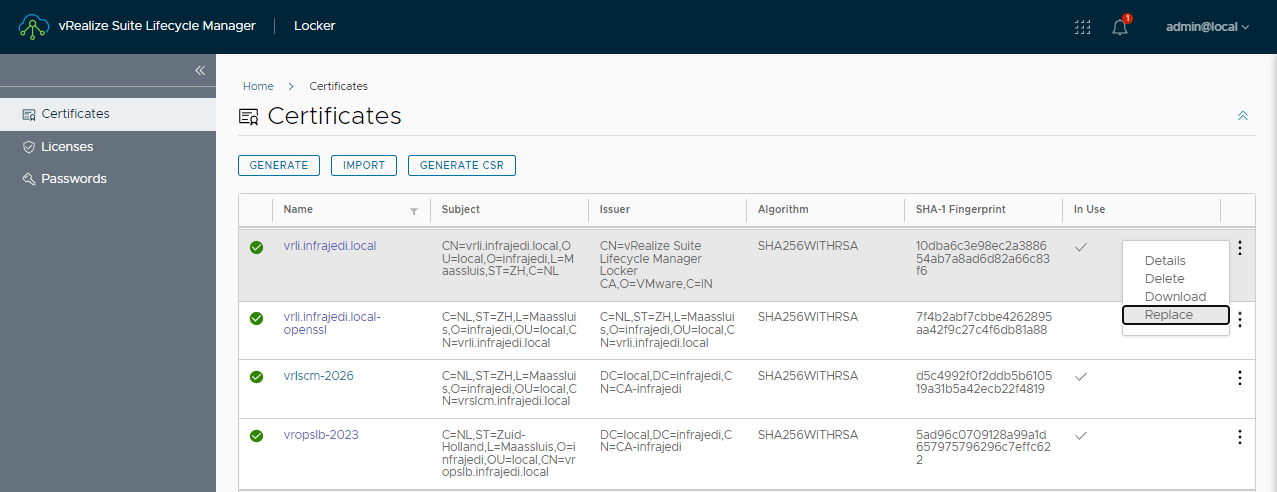
=> Locker, Certificates, 3 dots on existing vrli certificate
- Replace
- Check Current Certificate
- Check Certificate References / usage

- Select new Certificate
- Run Precheck
- All checks should pass, but there will always be a warning about re-establish trust between products. This means for example you have to validate the vRLI connection in vROPS and accept the new certificate. Log Insight Agent also needs to have the certificate updated
- Click Finish
This should finish quite fast. Start or refresh a vRLI browser tab/window and doublecheck if certificate replacement has taken place.
Replace vRSLCM integrated vRLI Certificates – option 2
If your vRLI is deployed from- or imported to vRLSCM it is easy to replace the certificates. This section describes the second option to accomplish this.
=> Lifecycle Operation, Environments, <Your environment>, View Details
- Select vRLI
- Click the 3 Dots, Replace Certificate

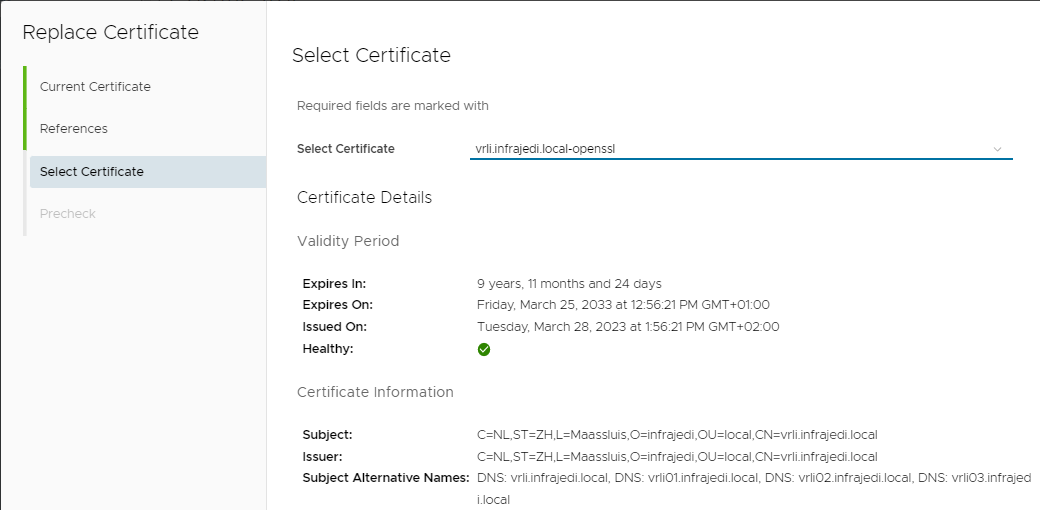
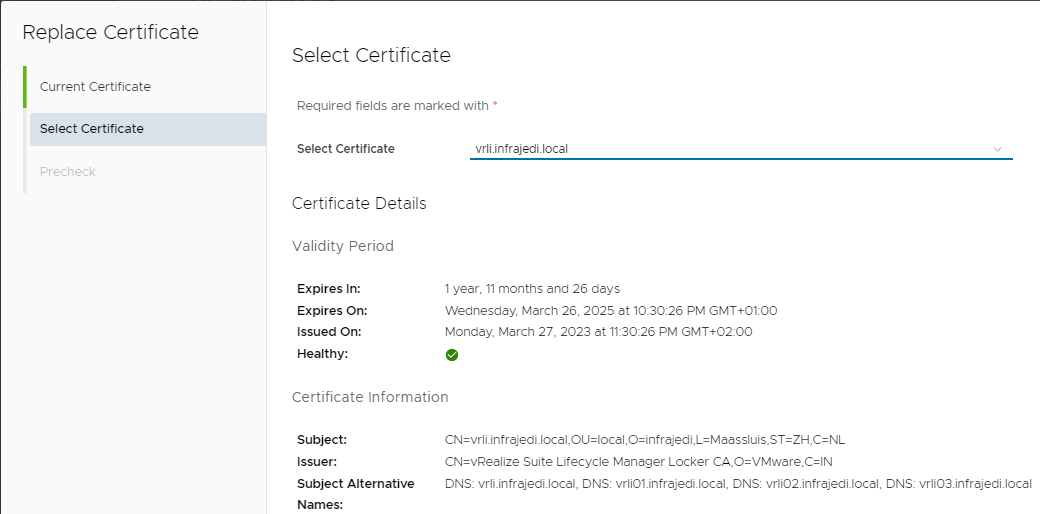
- Screen: Current Certificate; show your current Certifcate. Click Next
- Screen: Select Certificate; Select the new Certificate. Click Next
- Run the Precheck.
- All checks should pass, but there will always be a warning about re-establish trust between products. This means for example you have to validate the vRLI connection in vROPS and accept the new certificate. Log Insight Agent also needs to have the certificate updated.
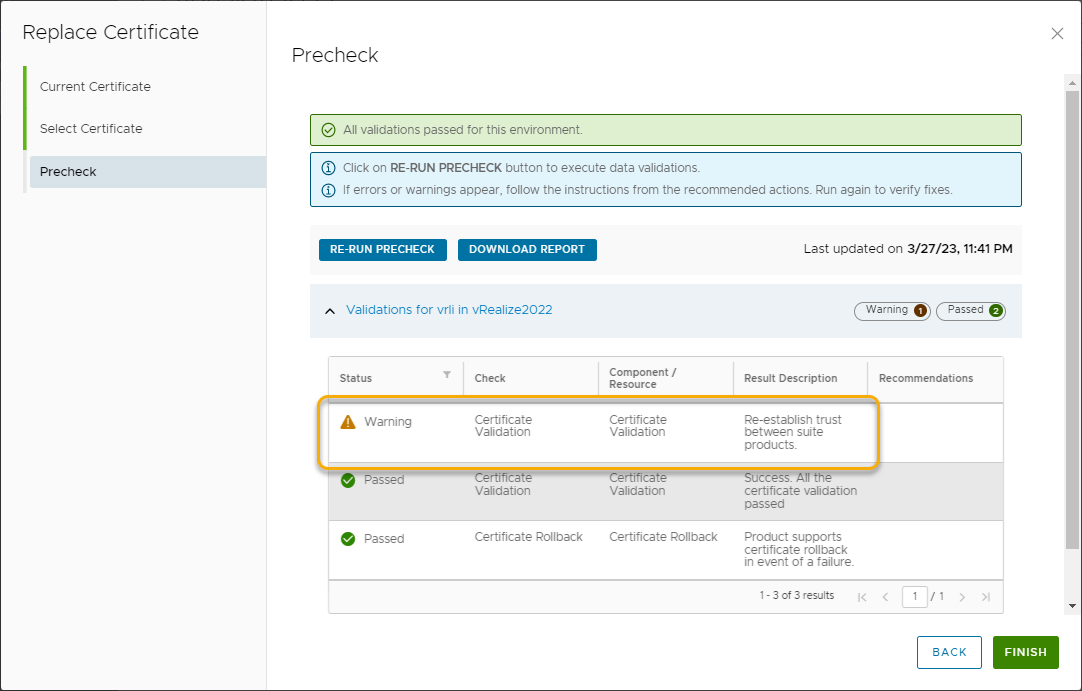
- Click Finish
- This should finish quite fast. Start or refresh a vRLI browser tab/window and doublecheck if certificate replacement has taken place.
Manual replace vRLI Certificates
To manually replace to vRLI Certificates you must first construct a .pem file.
The .pem file consists of the contents of the following files (where applicable)
- The Private Key (.key)
- The Primary Certificate (.crt)
- The Intermediate Certificate (.crt)
- The Root Certificate (.crt)
VMware Documentation Reference: https://docs.vmware.com/en/vRealize-Log-Insight/8.10/com.vmware.log-insight.administration.doc/GUID-93E0A9FA-9C72-47AE-9E54-9982F4604FE1.html
If you have created the CSR with the openssl tool you will have the private key available. If you have created the CSR with vRSLCM you have to open the generated .pem file and split the contents in and copy/paste the contents
After the creation of the .pem file login to Log Insight with a superadmin account.
=> Configuration, SSL, Choose file
- Pick the .pem certificate file
- Click Save