VIDM 3.3.5 Upgrade and Disk Resize
Update 15/11/2021
Please check out [this] blogpost with an updated procedure for resizing disks.
Original post
This week I wanted to update my vRealize deployment with vRA 8.4.1 and VIDM 3.3.5. My starting environment is vRSLCM 8.4, VIDM 3.3.4 and vRA 8.4.
The first step, is to upgrade vRSLCM. If you try to add VIDM 3.3.5 or vRA 8.4.1 to vRSLCM 8.4 the error “Selected files checksums does not match with any product versions supported by vRealize Lifecycle Manager” is shown.
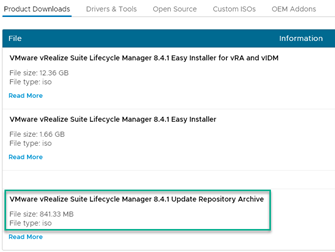
Depending on your environment, you can use an online repository or do this manually by downloading the update file “VMware-vLCM-Appliance-8.4.1.1-18067607-updaterepo.iso”
After that, mount the iso on the VM, go to Home, Settings, System Upgrade, Select “CD-ROM, Check for Upgrade.
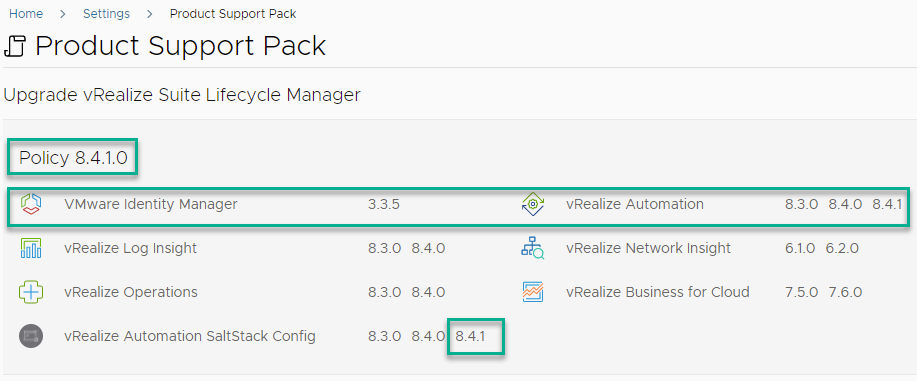
When the upgrade is finished, you can check the supported versions under Settings, Product Support Pack. In this case VIDM 3.3.5, vRA and VRASSC 8.4.1.
So far, so good! On to the next step and upgrade VIDM to version 3.3.5.
Unfortunately, the precheck returned two error Messages:
Disk space on / partition should be at least 3 GB for supporting upgrade. Current available space on / partition is 2.30 GB in node vidm.infrajedi.local
Disk space on /opt/vmware/horizon should be at least 7 GB for upgrade bundle upload. Current available space on /opt/vmware/horizon is 4 GB in node vidm.infrajedi.local
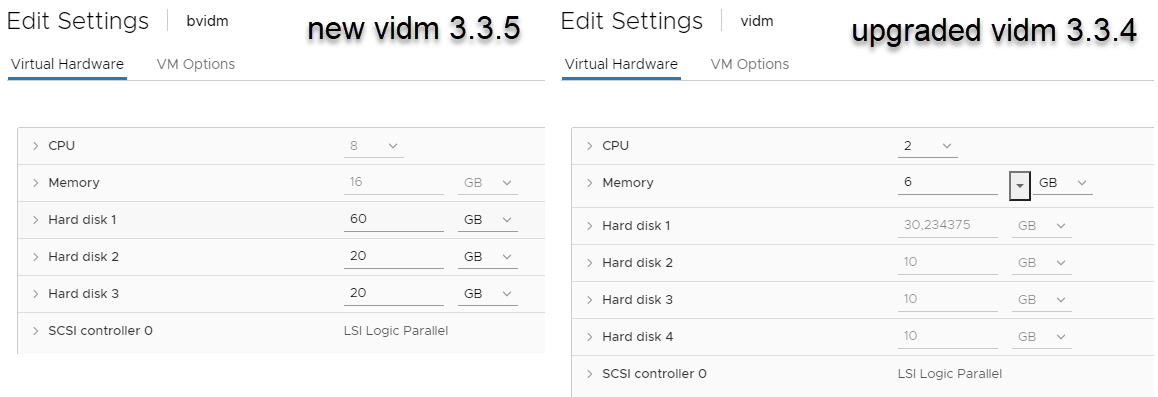
This is possibly caused by a different disk size and layout at first deployment time (I believe it was vidm 3.3.1).
Comparing the disk size and layout between my upgraded vidm 3.3.4 and a new 3.3.5 you can see the following differences (Note; I am using a small setup (with 2vCPU, 6GB RAM in my homelab):
The filesystem itself looks as follows:
 root@vidm [ ~ ]# df -h
 Filesystem                     Size  Used Avail Use% Mounted on
 devtmpfs                       2.9G     0  2.9G   0% /dev
 tmpfs                          3.0G   16K  3.0G   1% /dev/shm
 tmpfs                          3.0G  788K  3.0G   1% /run
 tmpfs                          3.0G     0  3.0G   0% /sys/fs/cgroup
 /dev/sda4                      8.8G  6.1G  2.3G  73% /
 tmpfs                          3.0G  180K  3.0G   1% /tmp
 /dev/sda1                      124M   30M   88M  26% /boot
 /dev/mapper/db_vg-db           9.8G  912M  8.4G  10% /db
 /dev/mapper/tomcat_vg-horizon  9.8G  5.0G  4.4G  54% /opt/vmware/horizon
 tmpfs                          597M     0  597M   0% /run/user/0
Note the /dev/sda4 partition of 8.8G with 2.3G Available.
The summarized output from the fdisk -l command looks as follows:
 Disk /dev/sda: 30.2 GiB, 32463912960 bytes, 63406080 sectors
 Device     Boot    Start      End  Sectors  Size Id Type
 /dev/sda1           2048   272383   270336  132M 83 Linux
 /dev/sda2         272384 17061887 16789504    8G 82 Linux swap / Solaris
 /dev/sda3  *    17061888 33849343 16787456    8G 83 Linux
 /dev/sda4       33849344 52733951 18884608    9G 83 Linux

 Disk /dev/sdb: 10 GiB, 10737418240 bytes, 20971520 sectors
 Disk /dev/sdc: 10 GiB, 10737418240 bytes, 20971520 sectors
 Disk /dev/sdd: 10 GiB, 10737418240 bytes, 20971520 sectors
 Disk /dev/mapper/db_vg-db: 10 GiB, 10733223936 bytes, 20963328 sectors
 Disk /dev/mapper/tomcat_vg-horizon: 10 GiB, 10733223936 bytes, 20963328
 Disk /dev/mapper/var_vg-var: 10 GiB, 10733223936 bytes, 20963328 sectors
There are various documents and kb articles out there (see below), but none was describing the exact instructions.
!!Note: I am not sure if the method below is supported. In case you are in doubt always contact VMware Support before you proceed.
- Shutdown the VIDM VM
- From vCenter, resize harddisk 1 from 30 to 50GB
- Take a snapshot
- Power On the VIDM VM
Install Parted with yum:
 root@vidm [ ~ ]# yum install parted
 Installing:
 parted          x86_64  3.2-9.ph3                    photon-updates          1.12M 1170933
 Total installed size:   1.12M 1170933
 Is this ok [y/N]: y
 ...
 Complete!
After installation run the parted tool against /dev/sda and list the partitions with the print command:
 root@vidm [ ~ ]# parted /dev/sda
 GNU Parted 3.2
 Using /dev/sda
 Welcome to GNU Parted! Type 'help' to view a list of commands.
 (parted) print
 print
 Model: VMware Virtual disk (scsi)
 Disk /dev/sda: 53.7GB
 Sector size (logical/physical): 512B/512B
 Partition Table: msdos
 Disk Flags:

 Number  Start   End     Size    Type     File system     Flags
  1      1049kB  139MB   138MB   primary  ext3
  2      139MB   8736MB  8596MB  primary  linux-swap(v1)
  3      8736MB  17.3GB  8595MB  primary  ext3            boot
  4      17.3GB  27.0GB  9669MB  primary  ext3
Note the disk size of /dev/sda is now 53.7GB
The next step is to resize partition 4 with the resizepart command from parted:
 (parted) resizepart
 resizepart
 Partition number? 4
 4
 Warning: Partition /dev/sda4 is being used. Are you sure you want to continue?
 Yes/No? Yes
 Yes
 End?  [27.0GB]? 53.7GB
 53.7GB
Check if your partition is resized with the print command:
 (parted) print
 print
 Model: VMware Virtual disk (scsi)
 Disk /dev/sda: 53.7GB
 Sector size (logical/physical): 512B/512B
 Partition Table: msdos
 Disk Flags:

 Number  Start   End     Size    Type     File system     Flags
  1      1049kB  139MB   138MB   primary  ext3
  2      139MB   8736MB  8596MB  primary  linux-swap(v1)
  3      8736MB  17.3GB  8595MB  primary  ext3            boot
  4      17.3GB  53.7GB  36.4GB  primary  ext3

 (parted)
 quit
 Information: You may need to update /etc/fstab.
The final step is to resize the file system of the extended partition with the resize2fs command:
 root@vidm [ ~ ]# resize2fs /dev/sda4
 resize2fs 1.45.5 (07-Jan-2020)
 Filesystem at /dev/sda4 is mounted on /; on-line resizing required
 old_desc_blocks = 1, new_desc_blocks = 3
 The filesystem on /dev/sda4 is now 8876032 (4k) blocks long.

 597M     0  597M   0% /run/user/0
Check if the partition and filesystem changes are active and enough free space is available:
 root@vidm [ ~ ]# df -h
 Filesystem                     Size  Used Avail Use% Mounted on
 devtmpfs                       2.9G     0  2.9G   0% /dev
 tmpfs                          3.0G   16K  3.0G   1% /dev/shm
 tmpfs                          3.0G  792K  3.0G   1% /run
 tmpfs                          3.0G     0  3.0G   0% /sys/fs/cgroup
 /dev/sda4                       34G  5.3G   27G  17% /
 tmpfs                          3.0G  180K  3.0G   1% /tmp
 /dev/sda1                      124M   30M   88M  26% /boot
 /dev/mapper/db_vg-db           9.8G 1022M  8.3G  11% /db
 /dev/mapper/tomcat_vg-horizon  9.8G  4.9G  4.4G  53% /opt/vmware/horizon
 tmpfs                          597M     0  597M   0% /run/user/1002
Looking good!
From vRSLCM, I re-ran the Pre-Check and this time there where no error messages (except about my cpu/memory sizing). Also no errors given for /opt/vmware/horizon, even if does not have at least 7 GB.
Links and Sources
How to zip and remove old vIDM logs in vIDM appliance [81220]
vIDM appliance has no space left on device /db for audit data [55417]
Creating and Configuring an additional disk for VMware Identity sva [2097696]
Expanding Disk Partition – [Photon 3] [Photon4]
VIDM 3.3.5 [Release Notes] [Documentation]
vRSLCM 8.4.1 [Release Notes] [Documentation]


Thanks for the article . I am trying same thing but i could not increase the disk size even after powering off vidm node. options are grayed out.
That is probably because you have a snapshot on the vm. Remove the snapshot. Resize the disk. Taka a snapshot and power on.