Unattended ESXi deployment with Go-Via
Recently I was looking for new way to deploy nested ESXi servers. Of course you can use the Nested ESXi OVA’s, but in some cases, I prefer to have more flexibility (or maybe it’s just for fun, exploring different options). I have manually setup a PXE and TFTP server, but this is not the most user-friendly way of doing things.
VMware Cloud Foundation (VCF) includes the VMware Imaging Appliance service (VIA) as part of the VMware Cloud Builder appliance to image servers for use in the management domain and VI workload domains. Unfortunately, this does not work for nested ESXi, unless you hack it as Marco described in a previous blogpost.
Then I got pointed at go-via which is created by Kim Johansson and Jonathan G. From the go-via Github page:
Go-via is a deployment tool for imaging and customising VMware ESXi Hypervisors. go-via is a single binary, that when executed performs the tasks of dhcpd, tftpd, httpd, and ks.cfg generator, with a angular front-end, and http-rest backend written in go, and sqlite for persisting.
The old version of VIA had some things it didn’t support which made it hard to run in enterprise environments. go-via brings added support for the following.
- IP-Helper , you can have the go-via binary running on any network you want and use RFC 3046 IP-Helper to relay DHCP requests to the server.
- UEFI , go-via does not support BIOS, but does support UEFI and secure-boot. BIOS may be added in the future.
- Virtual environments, it does not block nested esxi host deployment.
- HTTP-REST, everything you can do in the UI, you can do via automation also.
- Options to perform all prerequisites for VMware Cloud Foundation 4.x/5.x
Next to the excellent documentation on Github there is an excellent recording by Kim available on Youtube
I decided to give it a go(-via) and wrote this blog to share my experience.
One important thing before you start: Make sure you are deploying on a network where go-via will not interfere with existing DHCP Servers.
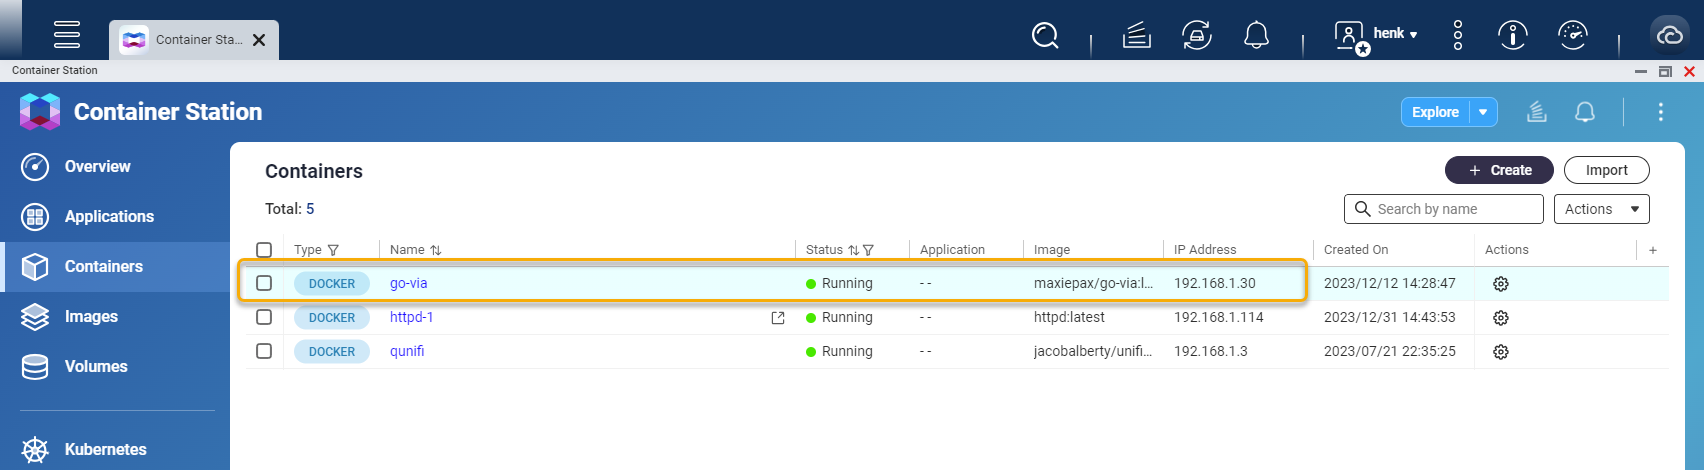
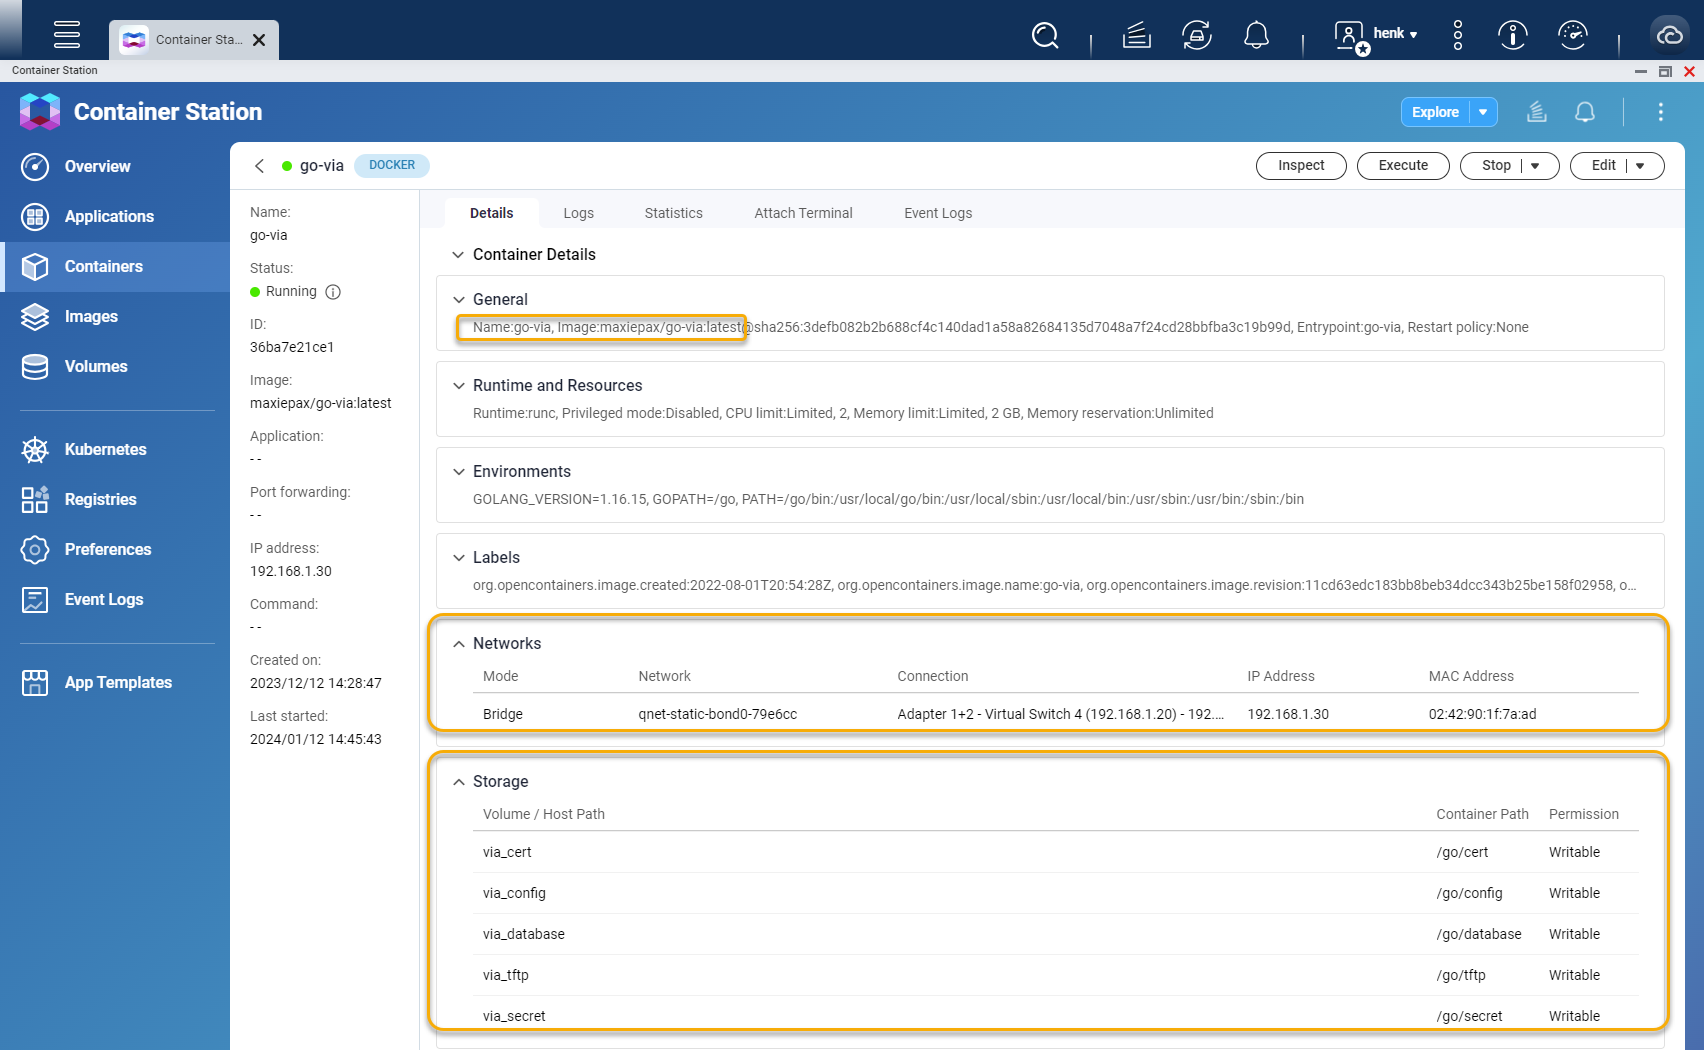
Go-via on QNAP Container Stations
My initial idea was to deploy the go-via container on my QNAP (TS-664) NAS.
The deployment is easy:
- Pull the
maxiepax/go-via image - Create (persistent) volumes for certs, config, database, secret and tftp
- Create a Container and map the volumes to the container during creation
- For networking choose Bridge mode so go-via can run on it’s own IP address.
Although the setup on QNAP Container Station works great, I ran into some networking related challenges and did not want to mess up my existing NAS and/or networking (dhcp) setup.
So I followed the other option to deploy go-via as docker container on Ubuntu.
Deploy as Docker Container on Ubuntu
I started by deploying the Ubuntu 22.04.3 LTS (Jammy Jellyfish) .ova from Ubuntu’s Cloud Image website and configured the basics:
- Configure static network
- Configure ssh
- Configure ntp
- Install updates
The go-via Github page has a good description on the steps to follow to run go-via:
- Install docker and docker-compose.
- Create a directory govia and change to that directory
The commands I used:
sudo apt install docker docker-compose
mkdir govia
cd govia
Create a docker-compose.yaml file in the govia directory
- Contents of my /home/ubuntu/govia/docker-compose.yaml file:
version: "3.9"
services:
  go-via:
    image: maxiepax/go-via:latest
    network_mode: host
    volumes:
      - ./tftp:/go/tftp
      - ./database:/go/database
      - ./config:/go/config
      - ./cert:/go/cert
      - ./secret:/go/secret
- start the go-via container with the command
sudo docker-compose up -dThe first time it will pull the required image(s)
ubuntu@govia:~/govia$ sudo docker-compose up -d
Pulling go-via (maxiepax/go-via:latest)... latest:
Pulling from maxiepax/go-via e4d61adff207:
Pull complete 4ff1945c672b:
Pull complete ff5b10aec998:
Pull complete 12de8c754e45: Pull complete
If al went well, you should now be able to connect to the web interface.
Note: to stop the container use the following command: sudo docker-compose stop
Go-via Web Configuration
Open a browser and go to the IP address of the Ubuntu host on port 8443: https://192.168.2.252:8443/
- Login with username: admin, password: VMware1!
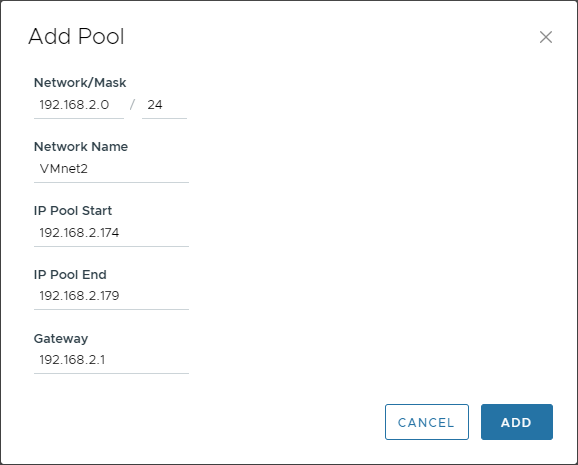
DHCP Pools
The first step is to configure a DHCP Scope / IP Pool:
- Select DCHP Pools on the lefthand menu and click Add pool.
- Enter the values as required. For example:
Network/Mask  : 192.168.2.0 / 24
Network Name  : VMnet2
IP Pool Start : 192.168.2.174
IP Pool End   : 192.168.2.179
Gateway       : 192.168.2.1
Example
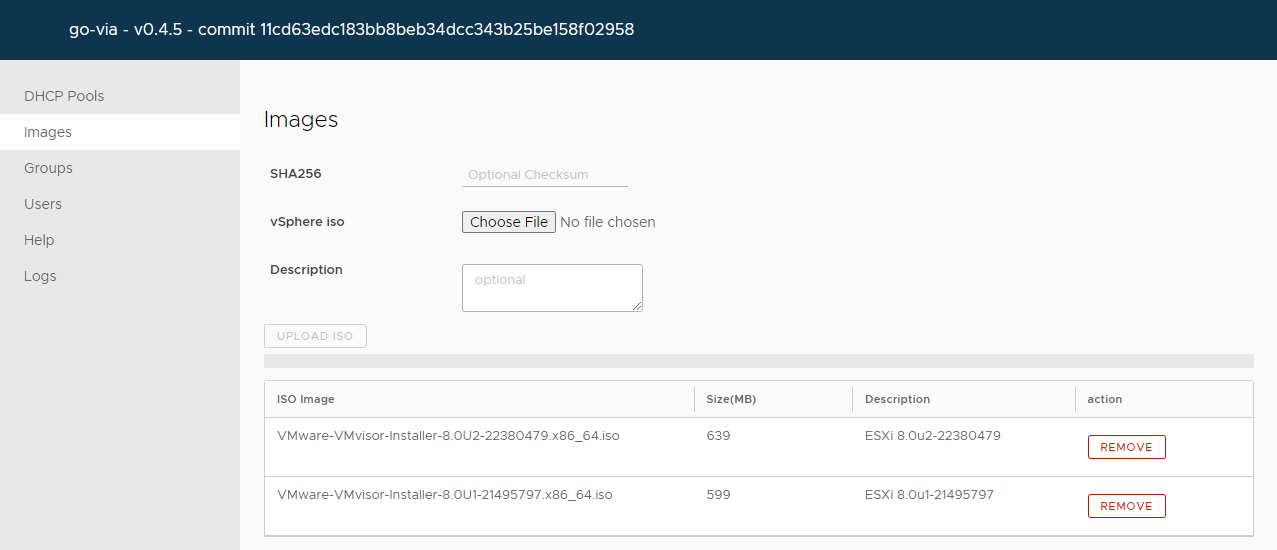
Images
The next step is to import your ESXi image(s)
- Click Images on the lefthand menu, click Choose File and browse to your ESXi iso image.
Optional (best practice) is to add the SHA256 Checksum and add a useful description.
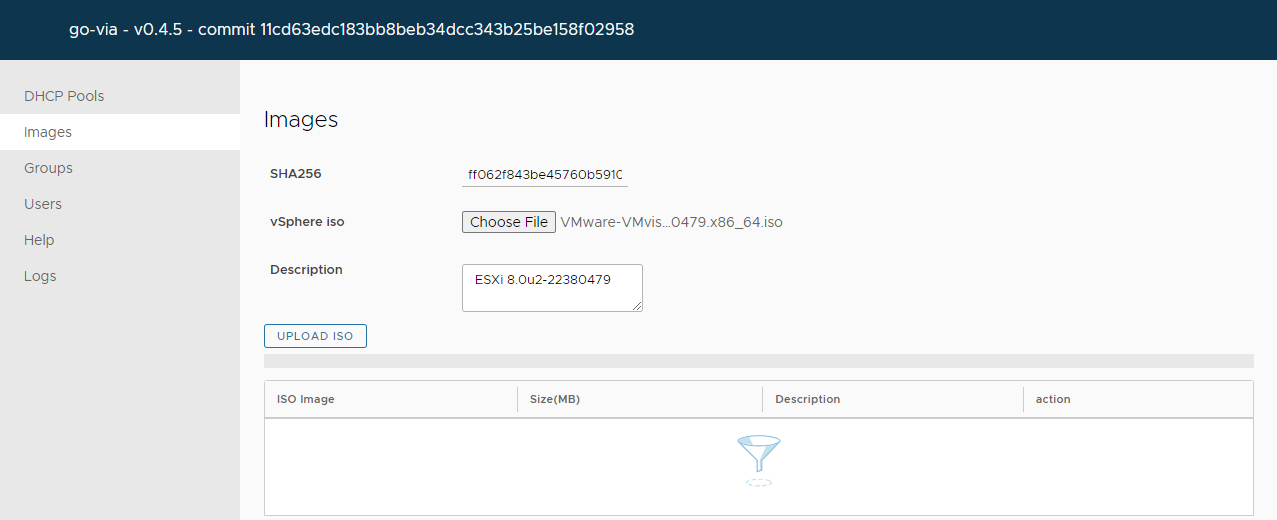
- Click Upload ISO.
Note: the .iso file will be placed in the /home/ubuntu/govia/tftp directory on the Ubuntu machine.
- Click Upload ISO again if you want to upload another .iso image
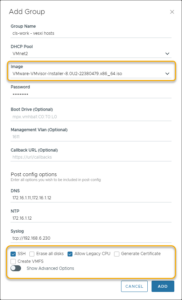
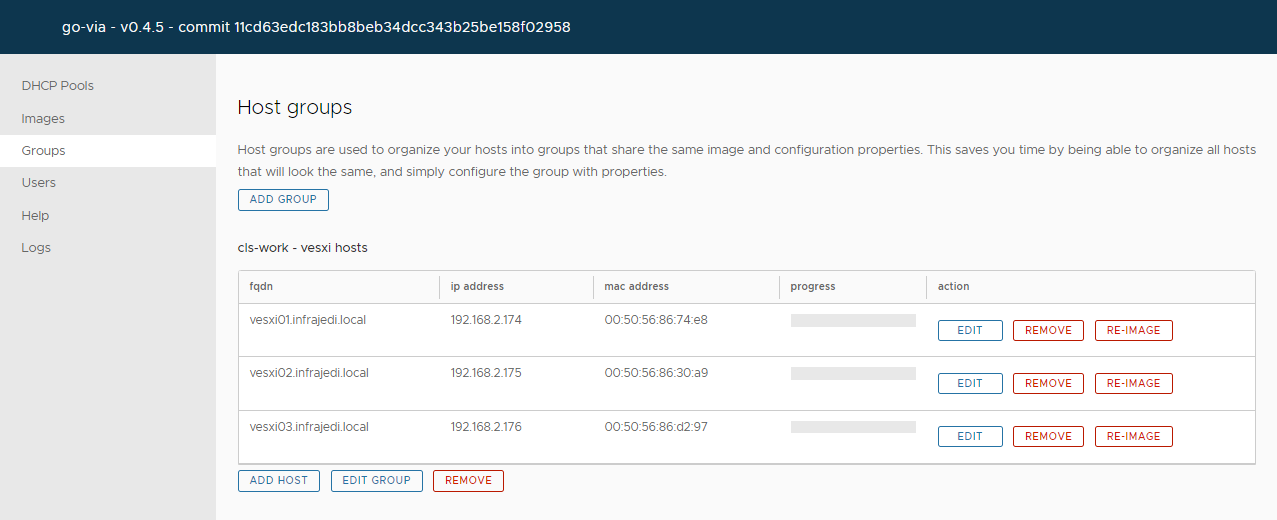
Host Groups
Host groups are used to organize your hosts into groups that share the same image and configuration properties. For example all hosts within a cluster.
- Select Groups on the lefthand menu, click Add Group
Group Name   : <Name of your ESXi host group>
DHCP Pool    : <Select DHCP Pool created earlier>
Image        : <Select ESXi image imported earlier>
Password     : <ESXi root password>
Boot Drive   : <optional>
Mgmt VLAN    : <optional>
Callback URL : <optional>

Post config options
DNS          : <DNS1>,<DNS2>
NTP          : <NTP1>
Syslog       : <tcp://SYSLOG01>,<ssl://SYSLOG02>

Additional options
Enable SSH
Erase all disks
Allow Legacy CPU
Generate Certificate
Create VMFS

Advanced Options
Create custom ks.cfg file
See screenshot below for the settings I used:
- Click Add.
After the group is created, you can now add Hosts to the new group.
- Click Add Host
- Add the FQDN, IP Address and MAC Address for each host
ESXi Deployment
As you may have seen in the screenshot above, I have created 3 virtual ESXi hosts (with a simple PowerCLI script).
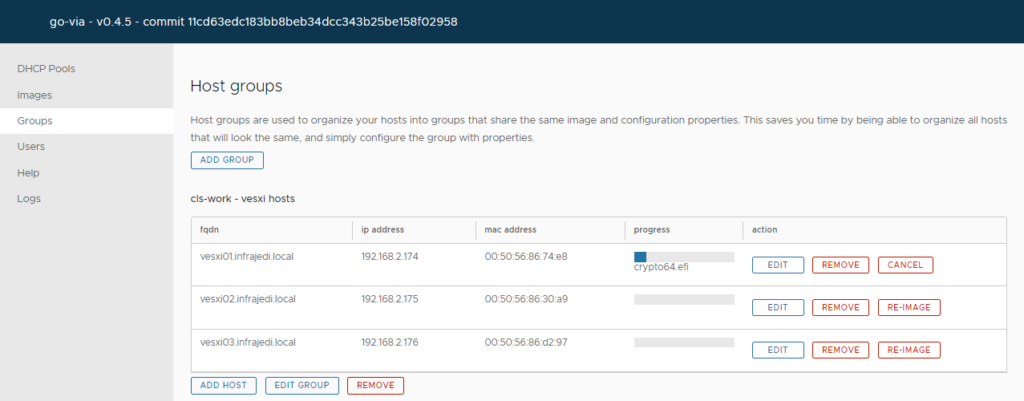
- Click on the Re-Image button for a host to be picked up for (re)installation.
Note: if you don’t click Re-Image nothing will happen with the host (which is very nice otherwise you would end up in an infinite install loop). So if you power-on a new or existing (virtual) ESXi servernothing will happen, no PXE boot, no installation, unless you have clicked re-image.
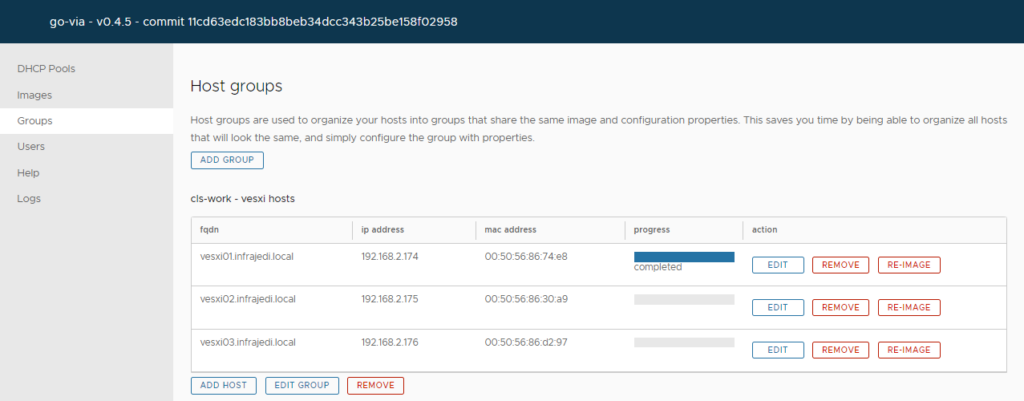
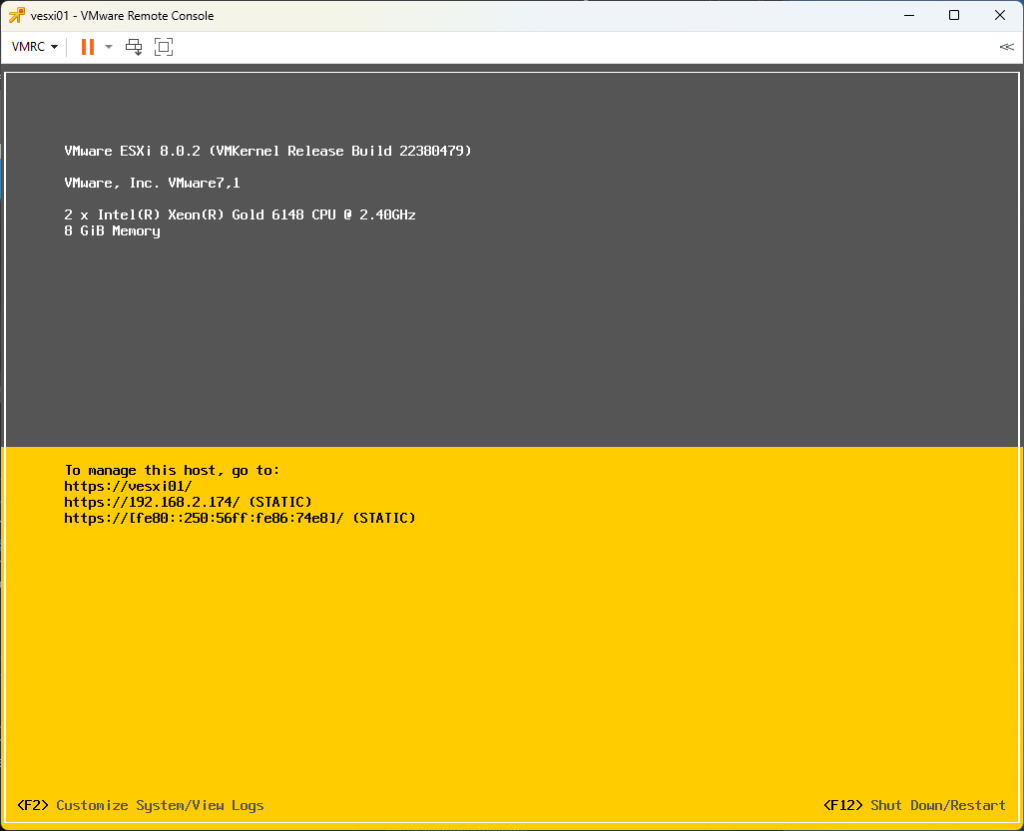
After some time the progress bar shows status completed and the ESXi installation is finished.
Re-install host
If you want to reinstall the host, simply click the re-image button again and reboot the host. If you want to reinstall with a different image, change the image setting on the Group.
Final words
Go-via is extremely easy to deploy AND use to (re)install your physical and virtual ESXi hosts.
For post configuration you can use the custom ks.cfg feature, PowerCLI or Host Profiles.
Even more interesting may be to use the option “Callback URL” (under group). With this option a HTTP-REST POST is performed to the defined URL when the imaging reaches Completed stage. To make this work you will have to setup a listener on that URL that triggers (a) follow-up action(s).
Bonus – Autostart
If you want docker-compose to autostart govia, create a new file with vi(m), for example /etc/systemd/system/govia.service
Add the following contents to the file:
[Unit]
Description=govia

[Service]

Restart=unless-stopped
ExecStart=/usr/bin/docker-compose -f /home/ubuntu/govia/docker-compose.yaml up
ExecStop=/usr/bin/docker-compose stop

[Install]

WantedBy=default.target
Enable autostart with the command:
systemctl enable govia.service