How to setup an SSH keypair for use with vRealize Automation 8 Blueprints
Introduction
I have started my career mainly working with Windows as Guest Operating system, but during the years I’ve been using Linux (mainly Red Hat and CentOS and lately Ubuntu) more and more. I am by far a specialist, but I know enough to do the basic setup, install an application, and do some simple configuration stuff. What I like especially about Linux are the deployment and configuration management tools there are available like cloud-init and Ansible. Using Linux for vRealize Automation demos always work great, since the small footprint and speed of deployment.
Speaking of vRA…, you may have seen some vRealize 8 or Cloud Assembly (vRA / CAS) blueprint examples that make use of cloud-init and ssh keys. To be honest, I got the concept of the private/public keypair usage but couldn’t figure out exactly how to set this up from my Windows workstation.
This blogpost will guide you on how to generate an SSH private / public keypair that you can use to log in to an Ubuntu server that is deployed with a vRA or CAS Blueprint.
Generate a Keypair with PuttyGen
Since I use Windows as my workstation GuestOS, I will use Putty and PuttyGen. You can download the latest version here [link] . To generate a public and private key:
- Start PuttyGen
- Go to Menu, Key and make sure SSH-2 RSA key is selected.
- Under Parameters, select RSA as type of key to generate
- You may wish to set the number of bits to 4096, but for now, I’ll leave it the default 2048
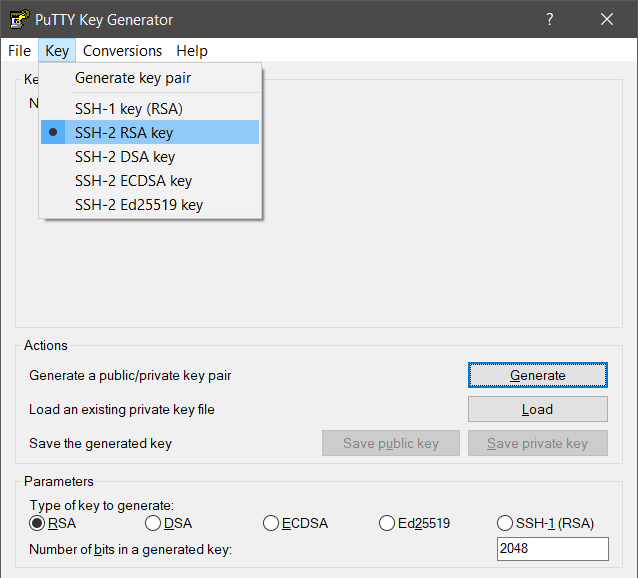
- Click on Generate and move like a madman in the empty area.
A public and private key (pair) is now generated:
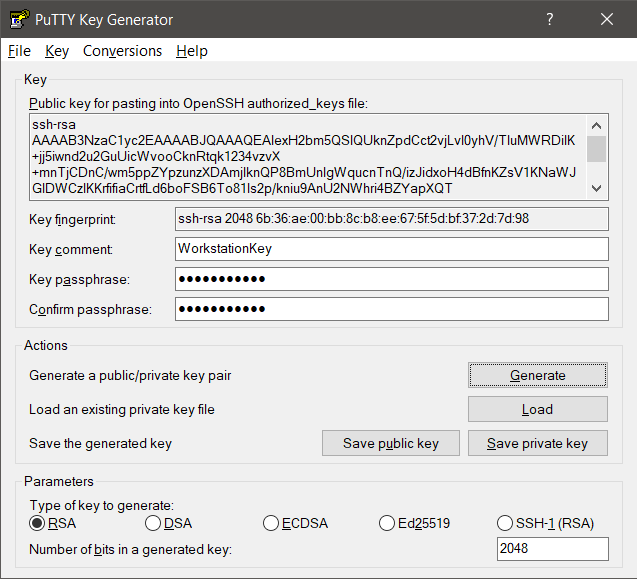
- Enter a comment for your key.
- Enter and confirm a passphrase (the password to unlock your private key)
- Save both the public and private key.
- For Windows the preferred directory is %userprofile%\.ssh (see further below why).
- Export the private Key as OpenSSH key via Menu Converions, Export OpenSSH key.
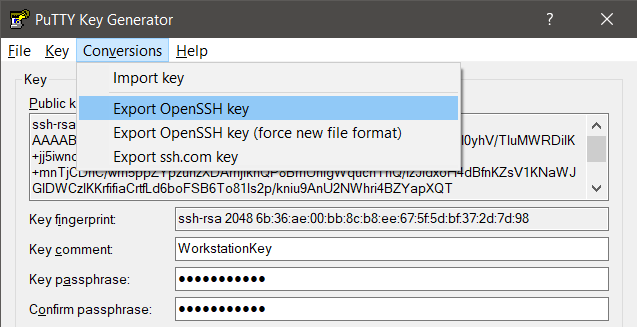
This OpenSSH key can be used with ssh.exe if you don’t want to use Putty (see further below).
Create a vRA Blueprint for your Linux Deployment
You can find some vRA and CAS blueprint code examples in the VMware documentation here [link].
Cloud config examples can be found in the cloud-init documentation here [link].
In this example I have used the Ubuntu Cloud images that can be found here [link] and I will create 2 users via cloud-init:
- One user that you can choose at deployment time, making use of username/password
- One static user that can be used with private/public keypair we just generated.
Below you can see part of the YAML code containing the cloudConfig (cloud-init) configuration:
      cloudConfig: |
        hostname: ${input.hostname}
        ssh_pwauth: yes
        chpasswd:
          list: |
            ${input.localuser}:${input.localuserpwd}
          expire: false
        users:
          - default
          - name: ${input.localuser}
            passwd: ${input.localuserpwd}
            lock_passwd: false
            sudo: ['ALL=(ALL) NOPASSWD:ALL']
            groups: wheel, sudo, admin
            shell: '/bin/bash'
          - name: sshuser
            ssh_authorized_keys:
              - ssh-rsa ‘stripped PuttyGen public key here’
            sudo: ['ALL=(ALL) NOPASSWD:ALL']
            groups: [wheel, sudo, admin]
            shell: '/bin/bash'
The first user that will be created is based on the Blueprint inputs “localuser” and “localuserpwd”.
ssh_pwauth is set to yes in the Blueprint, otherwise you cannot login through SSH with username/password. If you do not configure this setting, Putty will throw a Fatal Error: No supported authentication methods available (server sent: publickey)

The corresponding setting for on your linux system can be found in /etc/ssh/sshd_config.
Look for PasswordAuthentication. A restart of sshd is required to make the changes active, but cloud-init will revert to the original settings after reboot.
The second user that will be created in this example has the name of “sshuser” and will make use of the previously generated public key. However, the key you saved with Puttygen looks something like this:
---- BEGIN SSH2 PUBLIC KEY ---- Comment: "WorkstationKey" AAAAB3NzaC1yc2EAAAABJQAAAQEAlexH2bm5QSlQUknZpdCct2vjLvI0yhV/TluM WRDilK+jj5iwnd2u2GuUicWvooCknRtqk1234vzvX+mnTjCDnC/wm5ppZYpzunzX DAmjIknQP8BmUnIgWqucnTnQ/izJidxoH4dBfnKZsV1KNaWJGlDWCzIKKrfifiaC rtfLd6boFSB6To81ls2p/kniu9AnU2NWhri4BZYapXQT+dFYPOGm53LNeZn8owxy osV5lYFNMDNLPydolRX24VBS/kBbXqMPicrmexj0d7FY/RyWMsxKz2bcU17OCP30 fqA8sXcYaiALMPdLhsfD+/5RdossmRm9kTFKnebXJR4D8Fvd2Q== ---- END SSH2 PUBLIC KEY ----Within the blueprint you must strip some bits and pieces to make it look like this and put it in the blueprint as one line (removing the linebreaks):
AAAAB3NzaC1yc2EAAAABJQAAAQEAlexH2bm5QSlQUknZpdCct2vjLvI0yhV/TluMWRDilK+jj5iwnd2u2GuUicWvooCknRtqk1234vzvX+mnTjCDnC/wm5ppZYpzunzXDAmjIknQP8BmUnIgWqucnTnQ/izJidxoH4dBfnKZsV1KNaWJGlDWCzIKKrfifiaCrtfLd6boFSB6To81ls2p/kniu9AnU2NWhri4BZYapXQT+dFYPOGm53LNeZn8owxyosV5lYFNMDNLPydolRX24VBS/kBbXqMPicrmexj0d7FY/RyWMsxKz2bcU17OCP30fqA8sXcYaiALMPdLhsfD+/5RdossmRm9kTFKnebXJR4D8Fvd2Q==The cloudConfig part of your blueprint should now look something like this:
      cloudConfig: |
        hostname: ${input.hostname}
        ssh_pwauth: yes
        chpasswd:
          list: |
            ${input.localuser}:${input.localuserpwd}
          expire: false
        users:
          - default
          - name: ${input.localuser}
            passwd: ${input.localuserpwd}
            lock_passwd: false
            sudo: ['ALL=(ALL) NOPASSWD:ALL']
            groups: wheel, sudo, admin
            shell: '/bin/bash'
          - name: sshuser
            ssh_authorized_keys:
              - ssh-rsa AAAAB3NzaC1yc2EAAAABJQAAAQEAlexH2bm5QSlQUknZpdCct2vjLvI0yhV/TluMWRDilK+jj5iwnd2u2GuUicWvooCknRtqk1234vzvX+mnTjCDnC/wm5ppZYpzunzXDAmjIknQP8BmUnIgWqucnTnQ/izJidxoH4dBfnKZsV1KNaWJGlDWCzIKKrfifiaCrtfLd6boFSB6To81ls2p/kniu9AnU2NWhri4BZYapXQT+dFYPOGm53LNeZn8owxyosV5lYFNMDNLPydolRX24VBS/kBbXqMPicrmexj0d7FY/RyWMsxKz2bcU17OCP30fqA8sXcYaiALMPdLhsfD+/5RdossmRm9kTFKnebXJR4D8Fvd2Q==
            sudo: ['ALL=(ALL) NOPASSWD:ALL']
            groups: [wheel, sudo, admin]
            shell: '/bin/bash'
In this example I have hard-coded a username and SSH Key, but you may of course base the username and its public key on blueprint inputs as well.
Deploy and test
Time for deployment and testing!
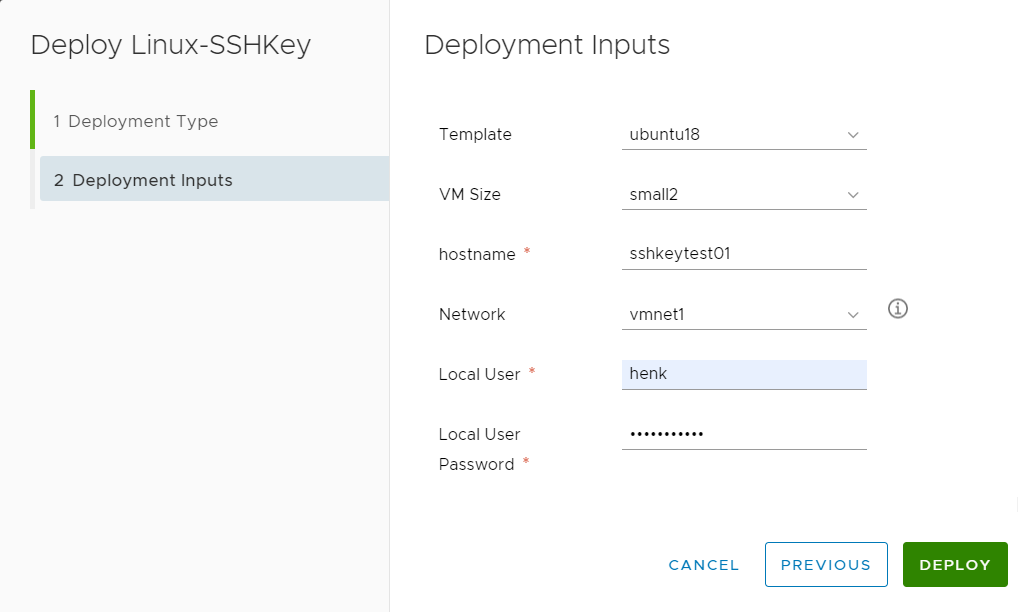
The deployment went fast and without problems.
Test 1: Login with username/password
- Open Putty, Enter the hostname or it’s IP addres and click Open
- Login with the username and password you provided during the deployment:
login as: henk
henk@192.168.1.35's password:
Welcome to Ubuntu 18.04.4 LTS (GNU/Linux 4.15.0-88-generic x86_64)

 * Documentation:  https://help.ubuntu.com
 * Management:     https://landscape.canonical.com
 * Support:        https://ubuntu.com/advantage

  System information as of Sat Jul 25 23:15:45 UTC 2020

  System load:  0.0               Processes:             86
  Usage of /:   10.3% of 9.52GB   Users logged in:       0
  Memory usage: 6%                IP address for ens192: 192.168.1.35
  Swap usage:   0%

0 packages can be updated.
0 updates are security updates.

Last login: Sat Jul 25 23:15:00 2020 from 192.168.1.34
To run a command as administrator (user "root"), use "sudo <command>".
See "man sudo_root" for details.

henk@sshkeytest01:~$
Great, that works!
Test 2: Login with username/private key via Putty SSH
- Open Putty, Enter the hostname or it’s IP addres
- Enter your private Key, via Connection, SSH, Auth and then browse to the Private key file for authentication.
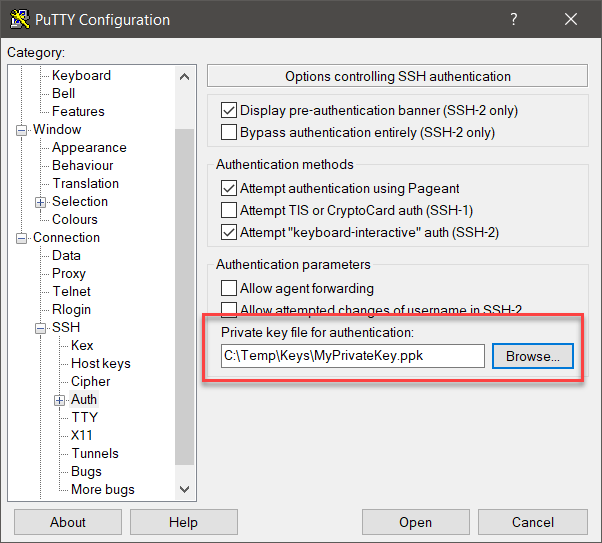
- Login with the sshuser we defined in the Blueprint
- Enter the Passphrase you have setup on your private key:
login as: sshuser
Authenticating with public key "WorkstationKey"
Passphrase for key "WorkstationKey":
Welcome to Ubuntu 18.04.4 LTS (GNU/Linux 4.15.0-88-generic x86_64)

 * Documentation:  https://help.ubuntu.com
 * Management:     https://landscape.canonical.com
 * Support:        https://ubuntu.com/advantage

  System information as of Sat Jul 25 23:27:23 UTC 2020

  System load:  0.0               Processes:             86
  Usage of /:   10.3% of 9.52GB   Users logged in:       0
  Memory usage: 6%                IP address for ens192: 192.168.1.35
  Swap usage:   0%

0 packages can be updated.
0 updates are security updates.

Last login: Sat Jul 25 23:24:17 2020 from 192.168.1.34
To run a command as administrator (user "root"), use "sudo <command>".
See "man sudo_root" for details.

sshuser@sshkeytest01:~$
Great, that works!
Test 3: Login in with username/private key via ssh
You can also use ssh from the Windows:
- Start a Command Prompt
- Enter command: ssh -i <privatekeyfile.ppk> username@hostname
For this test, I had saved all the generated keys in c:\temp\Keys and ssh does not like that as you can see from the error message below:
C:\Temp\Keys>ssh -i MyPrivateKey.ppk sshuser@192.168.1.35
The authenticity of host '192.168.1.35 (192.168.1.35)' can't be established.
ECDSA key fingerprint is SHA256:wp3yjLPCKtv9b/bJktV1hGzjG0rfGSz24BeXU/abq0I.
Are you sure you want to continue connecting (yes/no)? yes
Warning: Permanently added '192.168.1.35' (ECDSA) to the list of known hosts.
@@@@@@@@@@@@@@@@@@@@@@@@@@@@@@@@@@@@@@@@@@@@@@@@@@@@@@@@@@@
@         WARNING: UNPROTECTED PRIVATE KEY FILE!          @
@@@@@@@@@@@@@@@@@@@@@@@@@@@@@@@@@@@@@@@@@@@@@@@@@@@@@@@@@@@
Permissions for 'MyPrivateKey.ppk' are too open.
It is required that your private key files are NOT accessible by others.
This private key will be ignored.
Load key "MyPrivateKey.ppk": bad permissions
The trick is to place the private keys in the .ssh folder under the user’s homedirectory, so copy the private keys over from where you saved them to %userprofile%\.ssh\
Running the same command again got me one step further but also returned an error.
Directory of C:\Users\hengelsman\.ssh

26/07/2020  22:05    <DIR>          .
26/07/2020  22:05    <DIR>          ..
25/07/2020  23:26             1.743 id_rsa
26/07/2020  01:12               525 known_hosts
26/07/2020  00:23             1.480 MyPrivateKey.ppk
26/07/2020  00:47             1.743 MyPrivateOpenSSLKey.ppk
               4 File(s)          5.491 bytes
               2 Dir(s)  673.928.843.264 bytes free

C:\Users\hengelsman\.ssh>ssh -i MyPrivateKey.ppk sshuser@192.168.1.35
Load key "MyPrivateKey.ppk": invalid format
sshuser@192.168.1.35's password:
Permission denied, please try again.
sshuser@192.168.1.35's password:
The trick here is to use the Converted OpenSSL key.
C:\Users\hengelsman\.ssh>ssh -i MyPrivateOpenSSLKey.ppk sshuser@192.168.1.35
Enter passphrase for key 'MyPrivateOpenSSLKey.ppk':
Welcome to Ubuntu 18.04.4 LTS (GNU/Linux 4.15.0-88-generic x86_64)

 * Documentation:  https://help.ubuntu.com
 * Management:     https://landscape.canonical.com
 * Support:        https://ubuntu.com/advantage

  System information as of Sat Jul 25 23:41:27 UTC 2020

  System load:  0.0               Processes:             86
  Usage of /:   10.3% of 9.52GB   Users logged in:       0
  Memory usage: 6%                IP address for ens192: 192.168.1.35
  Swap usage:   0%

0 packages can be updated.
0 updates are security updates.

Last login: Sat Jul 25 23:27:24 2020 from 192.168.1.34
To run a command as administrator (user "root"), use "sudo <command>".
See "man sudo_root" for details.

sshuser@sshkeytest01:~$
All tests successful!
You can find the full blueprint below:
formatVersion: 1
inputs:
  template:
    type: string
    enum:
      - centos7
      - centos8
      - ubuntu16
      - ubuntu18
    default: centos7
  size:
    type: string
    title: VM Size
    enum:
      - small1
      - small2
      - medium1
    default: small2
    description: VM Size
  hostname:
    type: string
    title: hostname
  vmnet:
    type: string
    title: Network
    enum:
      - vmnet1
      - vmnet2
      - vmnet3
    default: vmnet1
    description: Select Network
  localuser:
    type: string
    title: Local User
  localuserpwd:
    type: string
    encrypted: true
    title: Local User Password
  ServerType:
    type: string
    title: Server Type
    enum:
      - Generic
      - Infra
      - Test
      - Webserver
    default: Test
resources:
  Linux:
    type: Cloud.vSphere.Machine
    properties:
      image: '${input.template}'
      flavor: '${input.size}'
      name: '${input.hostname}'
      hostname: '${input.hostname}'
      networks:
        - network: '${resource.Network1.id}'
          assignment: dynamic
      tags:
        - key: vraserver
          value: 'true'
        - key: ServerType
          value: '${input.ServerType}'
      cloudConfig: |
        hostname: ${input.hostname}
        ssh_pwauth: yes
        chpasswd:
          list: |
            ${input.localuser}:${input.localuserpwd}
          expire: false
        users:
          - default
          - name: ${input.localuser}
            passwd: ${input.localuserpwd}
            lock_passwd: false
            sudo: ['ALL=(ALL) NOPASSWD:ALL']
            groups: wheel, sudo, admin
            shell: '/bin/bash'
          - name: sshuser
            ssh_authorized_keys:
              - ssh-rsa AAAAB3NzaC1yc2EAAAABJQAAAQEAlexH2bm5QSlQUknZpdCct2vjLvI0yhV/TluMWRDilK+jj5iwnd2u2GuUicWvooCknRtqk1234vzvX+mnTjCDnC/wm5ppZYpzunzXDAmjIknQP8BmUnIgWqucnTnQ/izJidxoH4dBfnKZsV1KNaWJGlDWCzIKKrfifiaCrtfLd6boFSB6To81ls2p/kniu9AnU2NWhri4BZYapXQT+dFYPOGm53LNeZn8owxyosV5lYFNMDNLPydolRX24VBS/kBbXqMPicrmexj0d7FY/RyWMsxKz2bcU17OCP30fqA8sXcYaiALMPdLhsfD+/5RdossmRm9kTFKnebXJR4D8Fvd2Q==
            sudo: ['ALL=(ALL) NOPASSWD:ALL']
            groups: [wheel, sudo, admin]
            shell: '/bin/bash'
        runcmd:
          - mkdir -p /root/test
          - echo "vRA Test Message" > /root/test/vratest.txt
  Network1:
    type: Cloud.vSphere.Network
    properties:
      networkType: existing
      constraints:
        - tag: 'vmnet:${input.vmnet}'