Air-gapped Terraform <> vRA integration
As a follow-up to the previous Terraform integration post I will now try to explain how we can complete the integration in a fully air-gapped environment. To achieve this we need to make several resources locally available. Let me first flash back to the non air-gapped situation for which we zoom into the external resources used.
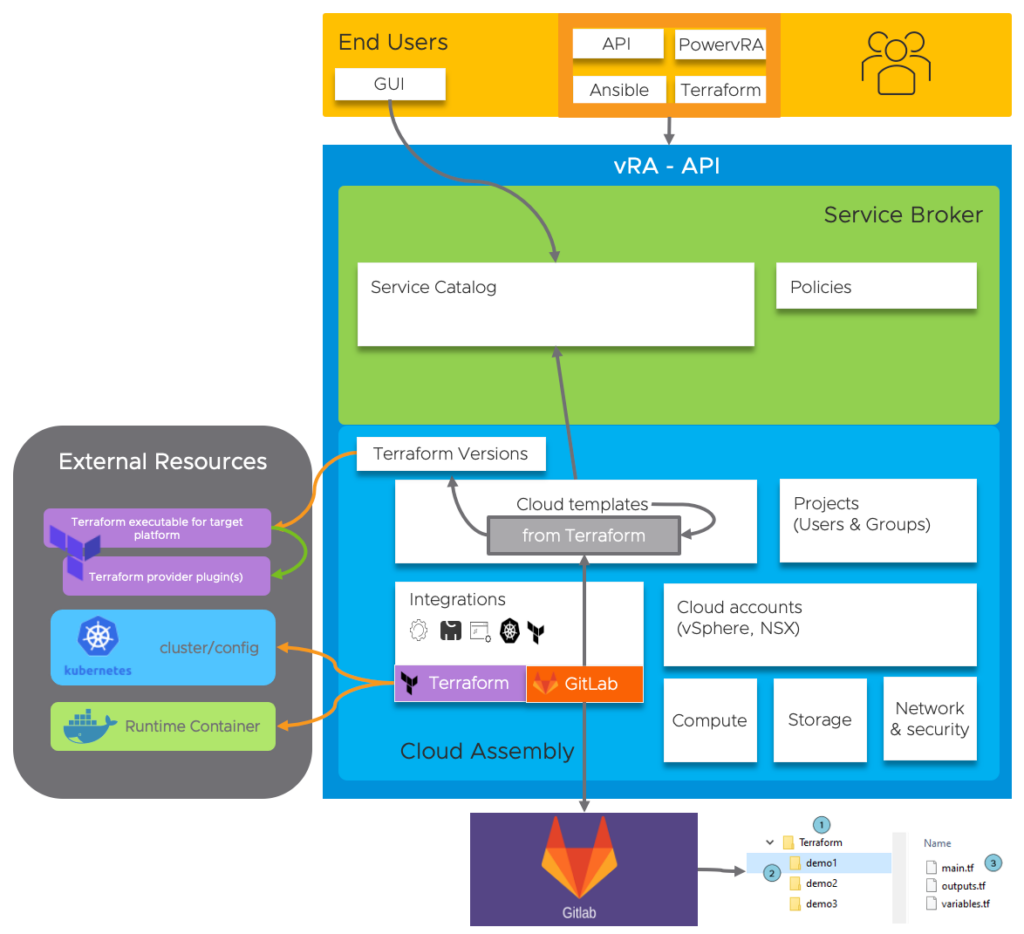
Let’s revisit the external resources that are used by default:
- During the Terraform integration we configured the following resources:
- The Terraform Runtime Container, downloaded from projects.registry.vmware.com
- The Kubernetes cluster URL or kubeconfig , which can be local or external
- The Terraform Version configuration for acquiring the executable to run in the container, downloaded from releases.hashicorp.com
- The Terraform Provider Plugins that are needed to run the specific piece of code, downloaded from releases.hashicorp.com
The question now is “how do we change the configuration to function in an air-gapped environment?”. VMware has documented this partly for the Terraform Versions available in the vRA product, but there is more to it when we need newer versions. Let’s first explain what we need to do using the below picture!
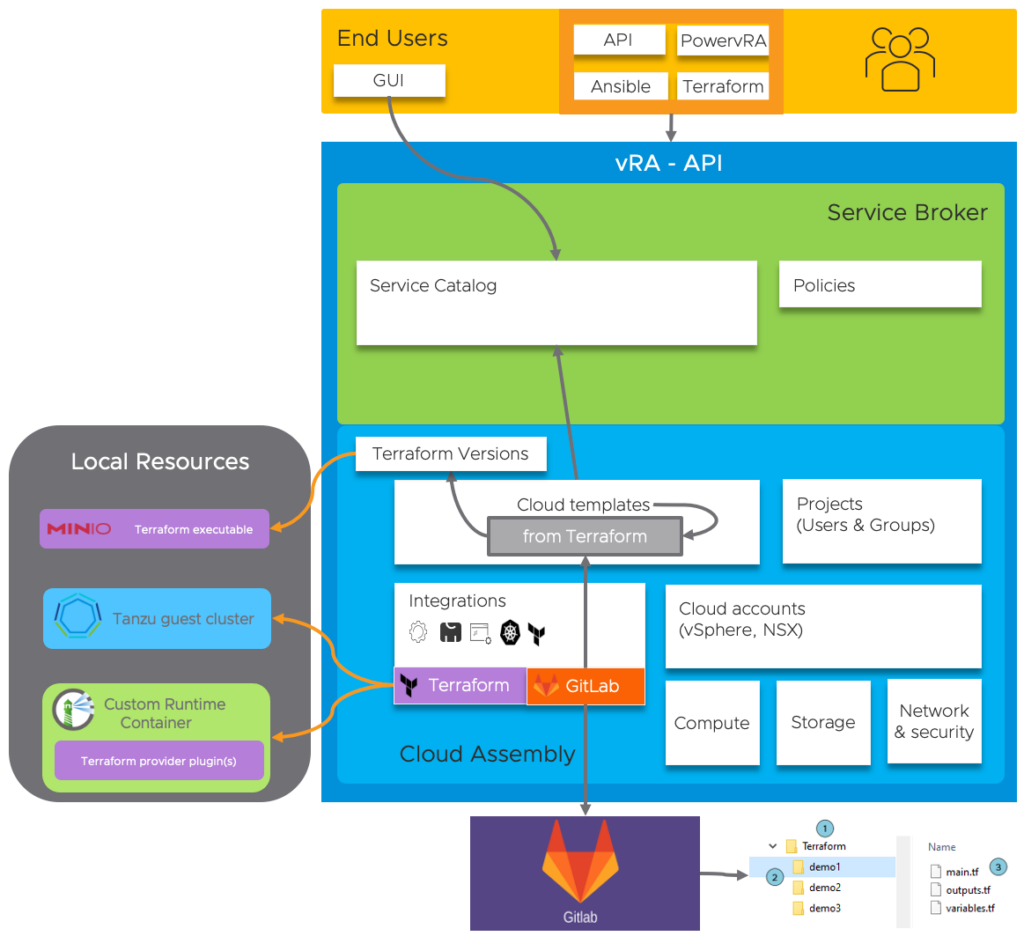
How does the resource list look now?
- The Terraform Runtime Container needs to be customized and hosted on a local registry (Harbor in my case). This is a rebuild version of the original container with added local providers and config-params to NOT check for updates
- The Kubernetes configuration will point to a local cluster (vSphere with Tanzu in my case) where the Container will actually run
- The Terraform Version executable will be hosted locally on a local source (Minio in my case)
As you probably understand the main pain point is to create that custom container. In the following paragraphs I will explain how to create these custom containers. For this, some basic Docker knowledge is required!
As mentioned earlier implementation differs between older en newer Terraform versions!
Custom Container based on Terraform versions up to 0.12.31
Although this procedure is described in the online-docs, I will summarize the steps based on my experience and as a comparison to the new procedure in the next paragraph.
The basic steps to create a custom container with a local Docker-instance and Dockerfile are:
- Pull the default Runtime container
- Create a local folder for the provider-plugings (vSphere/NSX/Infoblox/…)
- Download the provider plugins
- Define the Terraform-init environment arguments to tell it where to find the local plugins and NOT to check for new plugins
- Tag/build/run and push the container to the local registry
So, how does the Dockerfile look like? An example:
FROM projects.registry.vmware.com/vra/terraform:latest as final
# Create provider plug-in directory
ARG plugins=/tmp/terraform.d/plugin-cache/linux_amd64
RUN mkdir -m 777 -p $plugins
# Download and unzip all required provider plug-ins from hashicorp to provider directory
RUN cd $plugins && \
wget -q https://releases.hashicorp.com/terraform-provider-infoblox/1.1.0/terraform-provider-infoblox_1.1.0_linux_amd64.zip &&\
unzip -o terraform-provider-infoblox_1.1.0_linux_amd64.zip &&\
wget -q https://releases.hashicorp.com/terraform-provider-nsxt/3.2.5/terraform-provider-nsxt_3.2.5_linux_amd64.zip &&\
 unzip -o terraform-provider-nsxt_3.2.5_linux_amd64.zip &&\
wget -q https://releases.hashicorp.com/terraform-provider-vsphere/2.0.2/terraform-provider-vsphere_2.0.2_linux_amd64.zip &&\
unzip -o terraform-provider-vsphere_2.0.2_linux_amd64.zip &&\
wget -q https://releases.hashicorp.com/terraform-provider-vra/0.4.1/terraform-provider-vra_0.4.1_linux_amd64.zip &&\
unzip -o terraform-provider-vra_0.4.1_linux_amd64.zip  &&\
rm *.zip
# For "terraform init" configure terraform CLI to use provider plug-in directory and not download from internet
ENV TF_CLI_ARGS_init="-plugin-dir=$plugins -get-plugins=false"
Now, build/Tag this Dockerfile locally but, before pushing the code to your local registry, it is wise to check if the custom image is setup correctly by running it locally on your docker-instance! Check for the folder, provider plugins and ENV-ARGS. Once these are all correct you can push the image to the local registry and reference it within the Terraform integration.
During deployment in vRA, and while using the “TF_LOG: DEBUG” option in your YAML-code, you will be able to monitor progress and validate the custom container is working correctly:
[INFO] Terraform version: 0.12.31
[INFO] TF_CLI_ARGS_init value: "-plugin-dir=/tmp/terraform.d/plugin-cache/linux_amd64 -get-plugins=false"
[DEBUG] checking for provider in "/tmp/terraform.d/plugin-cache/linux_amd64"
[DEBUG] found provider "terraform-provider-infoblox_v1.1.0_x4"
[DEBUG] found provider "terraform-provider-nsxt_v3.2.5"
[DEBUG] found provider "terraform-provider-vra_v0.4.1"
[DEBUG] found provider "terraform-provider-vsphere_v2.0.2_x5"
[DEBUG] found valid plugin: "vsphere", "2.0.2", "/tmp/terraform.d/plugin-cache/linux_amd64/terraform-provider-vsphere_v2.0.2_x5"
[DEBUG] found valid plugin: "infoblox", "1.1.0", "/tmp/terraform.d/plugin-cache/linux_amd64/terraform-provider-infoblox_v1.1.0_x4"
[DEBUG] found valid plugin: "nsxt", "3.2.5", "/tmp/terraform.d/plugin-cache/linux_amd64/terraform-provider-nsxt_v3.2.5"
[DEBUG] found valid plugin: "vra", "0.4.1", "/tmp/terraform.d/plugin-cache/linux_amd64/terraform-provider-vra_v0.4.1"
[DEBUG] checking for provisioner in "/tmp/terraform.d/plugin-cache/linux_amd64"
Initializing provider plugins...
Terraform has been successfully initialized!
[INFO] backend/local: starting Plan operation
[DEBUG] plugin: plugin started: path=/tmp/terraform.d/plugin-cache/linux_amd64/terraform-provider-vsphere_v2.0.2_x5 pid=215
[DEBUG] Creating new SOAP API session on endpoint 192.168.1.230
An execution plan has been generated and is shown below.
  # vsphere_folder.folder will be created
[DEBUG] plugin: plugin exited
Apply complete! Resources: 1 added, 0 changed, 0 destroyed
Custom Container based on Terraform versions after 0.13.xx
For certain providers, like Infoblox, newer versions of the Terraform executable are required. vRA 8.6 supports up to version 0.12.29, but as we already learned in my previous post, deployments will actually work up until version 0.14.11. As of version 0.13 Terraform changed the way they reference locally available providers. It’s called Provider Installation and part of a configuration file. Below examples of this .terraformrc file:
Filesystem example:
===================
disable_checkpoint = true
provider_installation {
  filesystem_mirror {
    path = "/root/.terraform.d/providers"
  }
}

URL example:
============
provider_installation {
   network_mirror {
     url = "https://local-webserver.local/providers/"
   }
 }
A key requirement for the path or URL(https!) in the above examples is the usage of strict folder structures (like we find them on https://releases.hashicorp.com)! Therefor the URL example is maybe the easiest way to make them available, but in my demo I will use the filesystem example. The second requirement is to tell the terraform executable NOT to check for newer versions of the plugins used. In this case we can reference that as an item in the .terraformrc file or else as an ENV-ARG. For older providers I also needed to add another argument NOT to verify the plugin.
The above means we have to change the Dockerfile to suit these new requirements. The steps to create the container remain the same, only the content changes! This is how the new Dockerfile would look like to support a deployment based on Infoblox and vSphere provider plugins:
FROM projects.registry.vmware.com/vra/terraform:latest as final
# Create provider plug-in directory
ARG plugins=/tmp/terraform.d/plugin-cache/linux_amd64
RUN mkdir -m 777 -p $plugins
# Download and unzip all required provider plug-ins from hashicorp to provider directory
RUN mkdir -m 777 -p /root/.terraform.d/providers/registry.terraform.io/hashicorp/vsphere/2.0.2/linux_amd64 &&\
cd /root/.terraform.d/providers/registry.terraform.io/hashicorp/vsphere/2.0.2/linux_amd64 && \
wget -q https://releases.hashicorp.com/terraform-provider-vsphere/2.0.2/terraform-provider-vsphere_2.0.2_linux_amd64.zip &&\
mkdir -m 777 -p /root/.terraform.d/providers/registry.terraform.io/infobloxopen/infoblox/2.0.1/linux_amd64 &&\
cd /root/.terraform.d/providers/registry.terraform.io/infobloxopen/infoblox/2.0.1/linux_amd64 && \
wget -q https://github.com/infobloxopen/terraform-provider-infoblox/releases/download/v2.0.1/terraform-provider-infoblox_2.0.1_linux_amd64.zip &&\
unzip -o terraform-provider-infoblox_2.0.1_linux_amd64.zip &&\
unzip -o terraform-provider-vsphere_2.0.2_linux_amd64.zip &&\
rm *.zip
# Download the config-file from local webserver
cd /root &&\
wget http://local-webserver.local/.terraformrc &&\
# For "terraform init" configure terraform CLI to use provider plug-in directory and not download from internet
ENV TF_CLI_ARGS_init="-verify-plugins=false"
ENV CHECKPOINT_DISABLE=1
Likewise, tag/build/run this Dockerfile locally and check if the custom image is setup correctly! Check for the folder, provider plugins and ENV-ARGS. Once these are all correct you can push the image to the local registry and reference it in the Terraform integration.
Be sure to use the newer Terraform Version 0.14.11 in your Deployment while still using the “TF_LOG: DEBUG” option in your YAML-code to be able to monitor progress and validate the custom container is working correctly:
[INFO] Terraform version: 0.14.11
Loading CLI configuration from /root/.terraformrc
[DEBUG] Explicit provider installation configuration is set
[INFO] TF_CLI_ARGS_init value: "-verify-plugins=false"
[INFO] Checkpoint disabled. Not running.
Initializing provider plugins...
- Finding infobloxopen/infoblox versions matching "2.0.1"...
- Installing infobloxopen/infoblox v2.0.1...
[DEBUG] plugin: starting plugin: path=/tmp/vra-tf-workspace/terraform/Infoblox-NewDNSRecord/.terraform/providers/registry.terraform.io/infobloxopen/infoblox/2.0.1/linux_amd64/terraform-provider-infoblox_v2.0.1
[DEBUG] plugin: plugin exited

Apply complete! Resources: 1 added, 0 changed, 0 destroyedKubernetes configuration
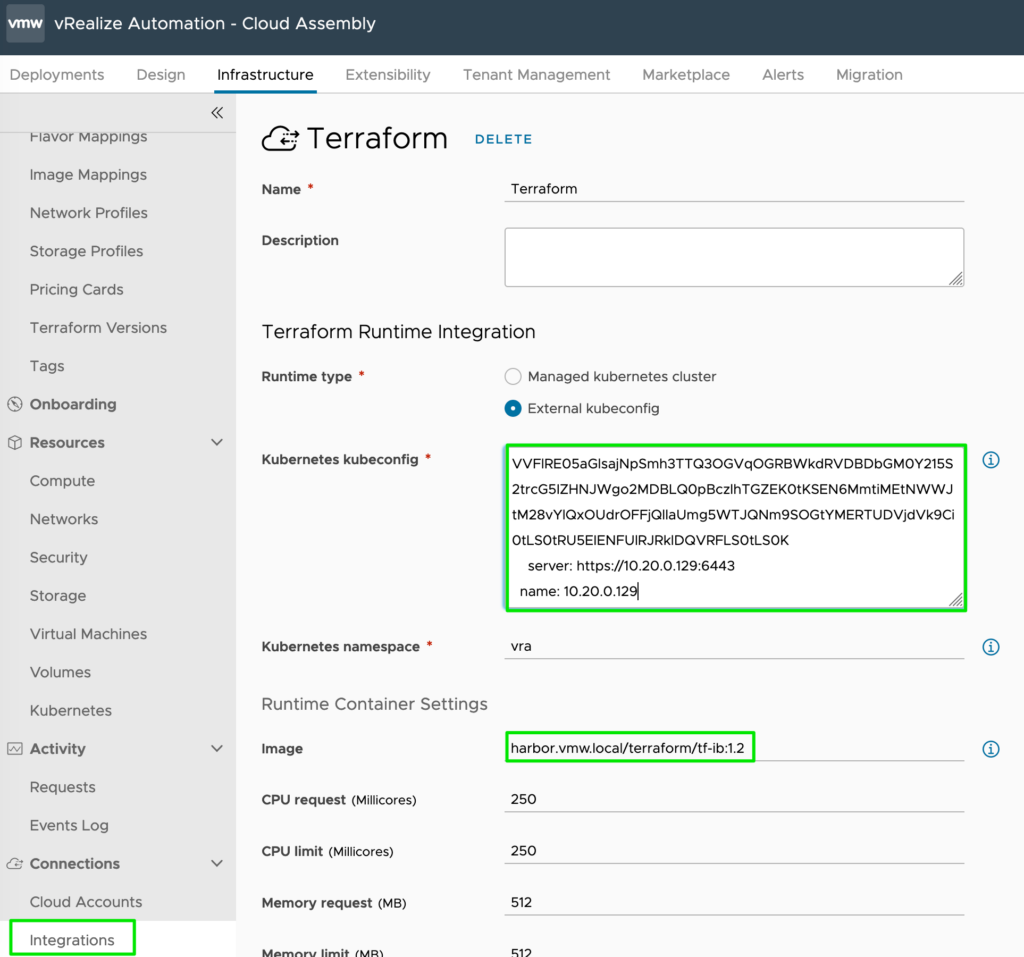
On the integration configuration page refer to your local Kubernetes Cluster API address or kubeconfig and specify the custom-image you created and pushed earlier.
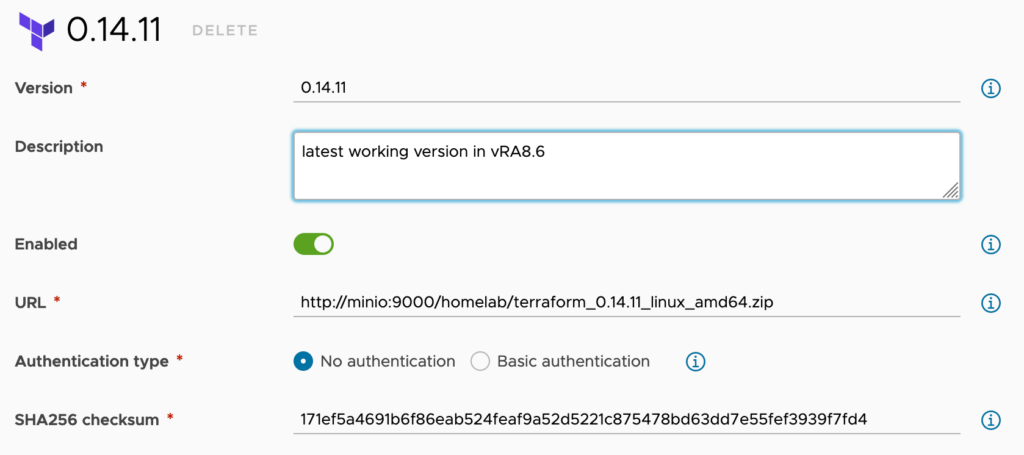
Terraform Version
Add new Terraform Version by downloading them from the official website and storing them on your local resource (Minio in this example).

This completes the fully air-gapped configuration and you are now ready to use your Terraform deployment!